
Raspberry Pi×4台によるKubernetesクラスター構築

| 目次 |
|---|
| はじめに構築環境ノード一覧その他使用したハードウェア出来上がり写真OSインストールとOSの初期設定kubernetes用ユーザーの作成デフォルトアカウント(ubuntu)の削除IPアドレスとホスト名の設定/etc/hostsの作成タイムゾーンやキーマップの設定IPv6の停止iptablesのインストールと設定DockerのインストールKubernetesクラスターの構築kubeadm、kubectl、kubeletのインストールcgruop でmemoryの有効化マスターノードの構築ワーカーノードの参加ロードバランサーの設定Ingressコントローラーの設定まとめ |
はじめに
業務の中でマイクロサービスアーキテクチャについての情報検索をしていると、必ず出てくるのがKubernetesに関する事です。kubernetesについては、自身で触った経験が無いことから、まずは、実際に環境構築して使ってみることにしました。
本来、Kubernetesのクラスタ環境は、クラウド上で提供するサービスを提供するために構築するものです。しかし、自身の勉強のために本物の環境を作るとなると、クラウドの利用料などでかなりの費用が発生します。そのため、通常は1台のPCで構築できるminikubeを使って勉強するものですが、やはりクラスター環境を作って、どのように動いているかを見てみたいという探求心から、手持ちの[Raspberry Pi](https://ja.wikipedia.org/wiki/Raspberry_Pi)2台に2台を足して(購入して)クラスターを構築することにしました。
ここでは、Kubernetesのクラスタ環境を夏休みの工作として実際に作って、夏休みの自由研究としてKubernetesの学習を行った時の構築手順や実際に使ってみて得られた所見を紹介します。
構築環境
ここでは、以下のようなハードウェア構成でKubernetesクラスターを構築します。
ノード一覧
ここでは、マスターノード1台とワーカーノード3台の構成で構築します。1台は、今後の負荷分散などの検証ができることを期待して、スペックの低いRaspberry Pi 3B+も含めてみました。
| 名称 | ホスト名 | IPアドレス | ハードウェア |
|---|---|---|---|
| マスターノード | ras-k8s-m1 | 192.168.0.81 | Raspberry Pi 4B(8GB) |
| ワーカーノード1 | ras-k8s-w1 | 192.168.0.82 | Raspberry Pi 4B(8GB) |
| ワーカーノード2 | ras-k8s-w2 | 192.168.0.83 | Raspberry Pi 4B(4GB) |
| ワーカーノード3 | ras-k8s-w3 | 192.168.0.84 | Raspberry Pi 3B+ |
その他使用したハードウェア
その他に、以下のハードウェアも使用しました。
- 1Gbps 5 Portスイッチ×1
- LANケーブル×5(Raspberry Pi用4本+他のスイッチ接続用1本)
- USBケーブル×4(Raspberry Pi給電用)
- USB電源アダプター(Raspberry Pi給電用)
出来上がり写真
参考までに出来上がりの写真を紹介します。大きさは、高さ15cm程です。
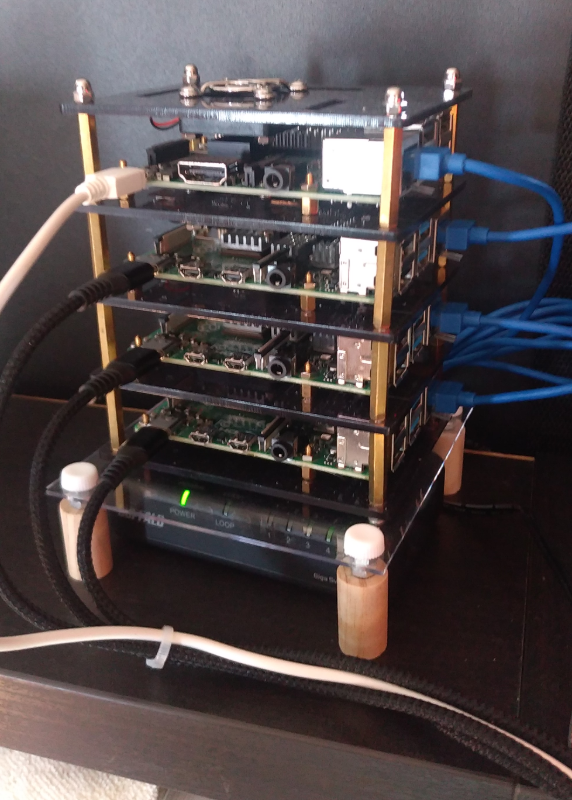
(一番下から順に、スイッチ、マスターノード、ワーカーノード1、ワーカーノード2、ワーカーノード3)
OSインストールとOSの初期設定
OSのインストールは、Raspberry Pi Imagerを使用してMicroSDにOSイメージを書き込みました。OSの初期設定は、マスターノード、ワーカーノード全台で以下のことを行いました。
kubernetes用ユーザーの作成
各種のセットアップや操作を行うKubernetes専用ユーザーを作成します。
$ sudo useradd -m -s /usr/bin/bash k8suser

$ sudo passwd k8suser          # パスワードを変更

New password:

Retype new password:

passwd: password updated successfully

$ sudo adduser k8suser sudo     # sudo グループにk8suserを追加

Adding user `k8suser' to group `sudo' ...

Adding user k8suser to group sudo

Done.
デフォルトアカウント(ubuntu)の削除
不要なデフォルトアカウントは、セキュリティ上よろしく無いので削除します。一旦前の手順で作成したユーザーでログインし直し、以下を実行します。
$ sudo deluser --remove-home ubuntu
IPアドレスとホスト名の設定
IPアドレスとホスト名を設定します。
IPアドレス設定は、以下のように固定設定をを行うか、ネットワーク内のDHCPサーバーでMACアドレスを登録して行います。
$ sudo vi /etc/netplan/99-network.yaml

network:

  version: 2

  renderer: networkd

  ethernets:

    eth0:

      dhcp4: false

      dhcp6: false

      addresses:

        - 192.168.0.81/24

      gateway4: 192.168.0.1

      nameservers:

        addresses:

          - 192.168.0.1

$ sudo netplan apply
ホスト名の変更は、「/etc/hosts」ファイルを直接編集してリブートするか、以下のように「hostnamectl」で行います。
なお、yun-craft.comは、当サイトのネットワークドメインとしています。
$ sudo hostnamectl set-hostname ras-k8s-m1.yun-craft.com

$ hostname    # 確認

ras-k8s-m1.yun-craft.com
/etc/hostsの作成
クラスタ内で名前だけでIPアドレス解決ができるように、「/etc/hosts」を編集します。
なお、「yun-craft.com」は、ネットワークドメインとします。
$ sudo vi /etc/hosts

# 追記する

192.168.0.81       ras-k8s-m1.yun-craft.com

192.168.0.82       ras-k8s-w1.yun-craft.com

192.168.0.83       ras-k8s-w2.yun-craft.com

192.168.0.84       ras-k8s-w3.yun-craft.com
タイムゾーンやキーマップの設定
タイムゾーンやキーマップを必要に応じて変更します。
$ sudo timedatectl set-timezone Asia/Tokyo

$ timedatectl | grep Time    # 確認する

                Time zone: Asia/Tokyo (JST, +0900) $ sudo localectl set-keymap jp106

$ localectl    # 確認する

   System Locale: LANG=C.UTF-8

       VC Keymap: jp106

      X11 Layout: jp

       X11 Model: jp106

     X11 Options: terminate:ctrl_alt_bksp
IPv6の停止
$ sudo vi /etc/sysctl.conf

# 追記する

net.ipv6.conf.all.disable_ipv6 = 1

net.ipv6.conf.default.disable_ipv6 = 1

net.ipv6.conf.eth0.disable_ipv6 = 1

net.ipv6.conf.lo.disable_ipv6 = 1

$ sudo sysctl -p

$ ip a    # 確認する。inet6が表示されないこと。
iptablesのインストールと設定
iptablesがnftablesバックエンドを使用しないようにします。
$ sudo apt-get -y install iptables arptables ebtables

$ sudo update-alternatives --set iptables /usr/sbin/iptables-legacy

$ sudo update-alternatives --set ip6tables /usr/sbin/ip6tables-legacy

$ sudo update-alternatives --set arptables /usr/sbin/arptables-legacy

update-alternatives: using /usr/sbin/arptables-legacy to provide /usr/sbin/arptables (arptables) in manual mode

$ sudo update-alternatives --set ebtables /usr/sbin/ebtables-legacy

update-alternatives: using /usr/sbin/ebtables-legacy to provide /usr/sbin/ebtables (ebtables) in manual mode
ますは、構築に必要なパッケージをインストールします。
$ sudo apt install apt-transport-https ca-certificates curl gnupg-agent software-properties-common
次に、Kubernetesの基礎であるDockerをインストールします。
$ curl -fsSL https://download.docker.com/linux/ubuntu/gpg | sudo apt-key add - sudo add-apt-repository "deb [arch=arm64] https://download.docker.com/linux/ubuntu $(lsb_release -cs) stable"

$ sudo apt install docker-ce docker-ce-cli containerd.io
さらに、不意にパッケージのアップデートでDockerのバージョンが変わらないようにholdします。
$ sudo apt-mark hold docker-ce docker-ce-cli containerd.io docker-ce set on hold.

docker-ce-cli set on hold.

containerd.io set on hold.
k8suserをdockerグループに加えます。
$ sudo adduser k8suser docker

Adding user `k8suser' to group `docker' ...

Adding user k8suser to group docker

Done.

$ cat /etc/group | grep docker    # 確認

docker:x:998:k8suser
最後に、グループを変更したので、k8suserのログオフ→ログオンを行います。
Kubernetesクラスターの構築
以下のようにマスターノードとワーカーノードを構築します。
kubeadm、kubectl、kubeletのインストール
マスターノードとワーカーノード全てで、kubeadm、kubectl、kubeletをインストールします。
$ sudo apt-get update && sudo apt-get -y install apt-transport-https curl

$ curl -s https://packages.cloud.google.com/apt/doc/apt-key.gpg | sudo apt-key add - $ cat < deb https://apt.kubernetes.io/ kubernetes-xenial main EOF

$ sudo apt -y install kubelet kubeadm kubectl
さらに、不意にパッケージのアップデートでkubernetesのバージョンが変わらないようにholdします。
$ sudo apt-mark hold kubelet kubeadm kubectl kubelet set on hold.

kubeadm set on hold.

kubectl set on hold.
インストールしたバージョンを確認します。kubernetesは発展中のためバージョンによる違いが結構あるので、バージョンを確認しておくことはとても重要です。今回のバージョンはv1.21.3でした。
$ kubeadm version -o json

{

  "clientVersion": {

    "major": "1",

    "minor": "21",

    "gitVersion": "v1.21.3",

    "gitCommit": "ca643a4d1f7bfe34773c74f79527be4afd95bf39",

    "gitTreeState": "clean",

    "buildDate": "2021-07-15T21:03:28Z",

    "goVersion": "go1.16.6",

    "compiler": "gc",

    "platform": "linux/arm64"

  }

}

$ kubectl version -o json

{

  "clientVersion": {

    "major": "1",

    "minor": "21",

    "gitVersion": "v1.21.3",

    "gitCommit": "ca643a4d1f7bfe34773c74f79527be4afd95bf39",

    "gitTreeState": "clean",

    "buildDate": "2021-07-15T21:04:39Z",

    "goVersion": "go1.16.6",

    "compiler": "gc",

    "platform": "linux/arm64"

  },

  "serverVersion": {

    "major": "1",

    "minor": "21",

    "gitVersion": "v1.21.3",

    "gitCommit": "ca643a4d1f7bfe34773c74f79527be4afd95bf39",

    "gitTreeState": "clean",

    "buildDate": "2021-07-15T20:59:07Z",

    "goVersion": "go1.16.6",

    "compiler": "gc",

    "platform": "linux/arm64"

  }

}

$ kubelet --version

Kubernetes v1.21.3
cgruop でmemoryの有効化
Raspberry PiのUbuntu Serverでは、/proc/cgroupsでmemoryが無効化されているようですので、有効化します。これを行っていないと、次に行う「kubeadmin init」がエラーになるようです。
まずは、現状を確認します。一番右が有効かどうかを示しています。(0:無効, 1:有効)
$ cat /proc/cgroups | grep memory

memory  0       105     0
次に、「/boot/firmware/cmdline.txt」に以下を追記します。
$ sudo vi /boot/firmware/cmdline.txt

cgroup_enable=cpuset cgroup_memory=1 cgroup_enable=memory    # 追記します。
OSを再起動し、再度以下のように確認します。
$ cat /proc/cgroups | grep memory

memory  2      116      1
マスターノードの構築
ここから先は、マスターノードとワーカーノードで手順が異なります。マスターノードでは、まず、「kubeadm」を使用して初期化を実行します。
パラメータは、API ServerのIPアドレス(「--apiserver-advertise-address=192.168.0.81」:マスターノード)とPodネットワークのアドレス(「pod-network-cidr=10.244.0.0/16」)を指定します。
$ sudo kubeadm init --apiserver-advertise-address=192.168.0.81 --pod-network-cidr=10.244.0.0/16

・

{中略}

・

[addons] Applied essential addon: CoreDNS [addons] Applied essential addon: kube-proxy

Your Kubernetes control-plane has initialized successfully!

To start using your cluster, you need to run the following as a regular user:

  mkdir -p $HOME/.kube

  sudo cp -i /etc/kubernetes/admin.conf $HOME/.kube/config

  sudo chown $(id -u):$(id -g) $HOME/.kube/config

You should now deploy a pod network to the cluster.

Run "kubectl apply -f [podnetwork].yaml" with one of the options listed at:

  https://kubernetes.io/docs/concepts/cluster-administration/addons/

Then you can join any number of worker nodes by running the following on each as root:

kubeadm join 192.168.0.81:6443 --token ktiwz8.extmfrtrsv14vag9 \

        --discovery-token-ca-cert-hash sha256:6350c33f9b21af5a88a8a0fcc3bc3dec404377ae598e4998ee85a00ce962c9a6
最後のハッシュ値は、ワーカーノードと連携するのに必要なので控えておきます。この値は、24時間まで有効らしいです。
次に、環境変数と入力補完の設定を行います。
$ mkdir -p $HOME/.kube

$ sudo cp -i /etc/kubernetes/admin.conf $HOME/.kube/config

$ sudo chown $(id -u):$(id -g) $HOME/.kube/config

$ echo 'KUBECONFIG=$HOME/.kube/config' >> $HOME/.bashrc

$ source $HOME/.bashrc

$ source <(kubectl completion bash)

$ echo "source <(kubectl completion bash)" >> $HOME/.bashrc
続いて、Podネットワークのアドオンとして実績の多いflannelを設定します。
$ curl https://raw.githubusercontent.com/coreos/flannel/master/Documentation/kube-flannel.yml -O

$ kubectl apply -f kube-flannel.yml

podsecuritypolicy.policy/psp.flannel.unprivileged created

clusterrole.rbac.authorization.k8s.io/flannel created

clusterrolebinding.rbac.authorization.k8s.io/flannel created

serviceaccount/flannel created

configmap/kube-flannel-cfg created

daemonset.apps/kube-flannel-ds created
この設定により、以下のようにネームスペースが「kube-system」のPodとして、「kube-flannel-ds」が追加されます。
$ kubectl get pods -n kube-system

NAME                                               READY   STATUS    RESTARTS   AGE

coredns-558bd4d5db-nhq57                           1/1     Running   6           2d

coredns-558bd4d5db-nlpbt                           1/1     Running   6           2d

etcd-ras-k8s-m1.yun-craft.com                      1/1     Running   6           2d

kube-apiserver-ras-k8s-m1.yun-craft.com            1/1     Running   6           2d

kube-controller-manager-ras-k8s-m1.yun-craft.com   1/1     Running   6           2d

kube-flannel-ds-bclt4                              1/1     Running   5           2d

kube-proxy-cx4p4                                   1/1     Running   5           2d

kube-scheduler-ras-k8s-m1.yun-craft.com            1/1     Running   6           2d
ワーカーノードの参加
次にマスターノード以外の全てのワーカーノードをクラスターに参加させます。クラスターに参加するためには、マスターノードのIPとマスターノードの構築で得られたハッシュ値を使用します。`
$ sudo kubeadm join 192.168.0.81:6443 --token ktiwz8.extmfrtrsv14vag9 \

        --discovery-token-ca-cert-hash sha256:6350c33f9b21af5a88a8a0fcc3bc3dec404377ae598e4998ee85a00ce962c9a6

[preflight] Running pre-flight checks

        [WARNING IsDockerSystemdCheck]: detected "cgroupfs" as the Docker cgroup driver. The recommended driver is "systemd". Please follow the guide at https://kubernetes.io/docs/setup/cri/

        [WARNING SystemVerification]: missing optional cgroups: hugetlb [preflight] Reading configuration from the cluster...

[preflight] FYI: You can look at this config file with 'kubectl -n kube-system get cm kubeadm-config -oyaml'

[kubelet-start] Writing kubelet configuration to file "/var/lib/kubelet/config.yaml"

[kubelet-start] Writing kubelet environment file with flags to file "/var/lib/kubelet/kubeadm-flags.env"

[kubelet-start] Starting the kubelet

[kubelet-start] Waiting for the kubelet to perform the TLS Bootstrap...

This node has joined the cluster:

* Certificate signing request was sent to apiserver and a response was received.

* The Kubelet was informed of the new secure connection details.

Run 'kubectl get nodes' on the control-plane to see this node join the cluster.
全てのノードを上記の手順で参加させた後で、以下のようにノードの状態を確認します。
$ kubectl get nodes

NAME                       STATUS   ROLES                  AGE   VERSION

ras-k8s-m1.yun-craft.com   Ready    control-plane,master    2d   v1.21.3

ras-k8s-w1.yun-craft.com   Ready                      2d   v1.21.3

ras-k8s-w2.yun-craft.com   Ready                      2d   v1.21.3

ras-k8s-w3.yun-craft.com   Ready                      2d   v1.21.3
workerノードの名称が無いのでworkerノードのラベルを設定します。
$ kubectl label node ras-k8s-w1. node-role.kubernetes.io/worker=worker

node/ras-k8s-w1. labeled

$ kubectl label node ras-k8s-w2. node-role.kubernetes.io/worker=worker

node/ras-k8s-w2. labeled

$ kubectl label node ras-k8s-w3. node-role.kubernetes.io/worker=worker

node/ras-k8s-w3. labeled

$ kubectl get nodes  # 確認する

NAME                       STATUS   ROLES                  AGE   VERSION

ras-k8s-m1.yun-craft.com   Ready    control-plane,master    2d   v1.21.3

ras-k8s-w1.yun-craft.com   Ready    worker                 30m   v1.22.1

ras-k8s-w2.yun-craft.com   Ready    worker                 29m   v1.22.1

ras-k8s-w3.yun-craft.com   Ready    worker                 29m   v1.22.1
全てのノードが準備できたことが確認できました。
ロードバランサーの設定
最後に、オンプレミス環境でLoadBalancerタイプのServiceを使用できるようにするためにMetalLBをインストールします。
MetalLBのバージョン確認は、MetalLB > Installation(https://metallb.universe.tf/installation/)で確認します。インストール時のバージョンは、v0.10.2でした。
まず、マニフェストファイルをダウンロードします。
$ curl https://raw.githubusercontent.com/metallb/metallb/v0.10.2/manifests/namespace.yaml -o namespace.yaml

$ curl https://raw.githubusercontent.com/metallb/metallb/v0.10.2/manifests/metallb.yaml -o metallb.yaml
次に、マニフェストファイルを適用します。
$ kubectl apply -f namespace.yaml

namespace/metallb-system created

$ kubectl apply -f metallb.yaml

Warning: policy/v1beta1 PodSecurityPolicy is deprecated in v1.21+, unavailable in v1.25+ podsecuritypolicy.policy/controller created

podsecuritypolicy.policy/speaker created

serviceaccount/controller created

serviceaccount/speaker created

clusterrole.rbac.authorization.k8s.io/metallb-system:controller created

clusterrole.rbac.authorization.k8s.io/metallb-system:speaker created

role.rbac.authorization.k8s.io/config-watcher created

role.rbac.authorization.k8s.io/pod-lister created

role.rbac.authorization.k8s.io/controller created

clusterrolebinding.rbac.authorization.k8s.io/metallb-system:controller created

clusterrolebinding.rbac.authorization.k8s.io/metallb-system:speaker created

rolebinding.rbac.authorization.k8s.io/config-watcher created

rolebinding.rbac.authorization.k8s.io/pod-lister created

rolebinding.rbac.authorization.k8s.io/controller created

daemonset.apps/speaker created

deployment.apps/controller created
最後に、Podの状態を確認します。うまくできていれば、speaker-xxxxxというPodがREADYがRunningとなります。
(マスターノードとワーカーノードの下図だけspeaker-xxxxxが登場します。)
$ kubectl get pod -n metallb-system

NAME                          READY   STATUS    RESTARTS   AGE

controller-6b78bff7d9-vq9hx   1/1     Running   0          24s

speaker-9xkbz                 1/1     Running   0          24s

speaker-rb8wg                 1/1     Running   0          24s

speaker-rvvd7                 1/1     Running   0          24s

speaker-vqd2l                 1/1     Running   0          24s
次にロードバランサーとして使用するIPアドレスの範囲を設定します。
以下のようなロードバランサーの設定を行います。
・metallb-config.yml
apiVersion: v1

kind: ConfigMap

metadata:

  namespace: metallb-system

  name: config

data:

  config: |

    address-pools:

    - name: default

      protocol: layer2

      addresses:

      - 192.168.0.91-192.168.0.99
最後のIPアドレス部分が、使用できるIPアドレスの範囲です。
上記の設定を適用します。
$ kubectl apply -f metallb-config.yml

configmap/config created
以上でロードバランサーの設定が完了しました。
Ingressコントローラーの設定
最後に、ロードバランサーを使うIngressコントローラーとしてNGINX Ingress Controllerを使用するように設定します。
IngressはL7ロードバランサーとして動作するもので、ロードバランサー(L4)とは異なります。
以下のようにしてNGINX Ingress Controllerを設定します。
# ↓後で撤去することも考えて一旦yamlファイルをダウンロードします。

$ curl https://raw.githubusercontent.com/kubernetes/ingress-nginx/controller-v1.0.0/deploy/static/provider/cloud/deploy.yaml -O

  % Total    % Received % Xferd  Average Speed   Time    Time     Time  Current

                                 Dload  Upload   Total   Spent    Left  Speed

100 19023  100 19023    0     0  37391      0 --:--:-- --:--:-- --:--:-- 37446

$ mv deploy.yaml nginx-ingress-controller.yml # ←ファイル名変更

$ kubectl apply -f nginx-ingress-controller.yml # ←適用

namespace/ingress-nginx created

serviceaccount/ingress-nginx created

configmap/ingress-nginx-controller created

clusterrole.rbac.authorization.k8s.io/ingress-nginx created

clusterrolebinding.rbac.authorization.k8s.io/ingress-nginx created

role.rbac.authorization.k8s.io/ingress-nginx created

rolebinding.rbac.authorization.k8s.io/ingress-nginx created

service/ingress-nginx-controller-admission created

service/ingress-nginx-controller created

deployment.apps/ingress-nginx-controller created

ingressclass.networking.k8s.io/nginx created

validatingwebhookconfiguration.admissionregistration.k8s.io/ingress-nginx-admission created

serviceaccount/ingress-nginx-admission created

clusterrole.rbac.authorization.k8s.io/ingress-nginx-admission created

clusterrolebinding.rbac.authorization.k8s.io/ingress-nginx-admission created

role.rbac.authorization.k8s.io/ingress-nginx-admission created

rolebinding.rbac.authorization.k8s.io/ingress-nginx-admission created

job.batch/ingress-nginx-admission-create created

job.batch/ingress-nginx-admission-patch created
以上で、Kubernetesクラスター環境が構築できました。
確認のために、全てのPodの状態を見てみます。
$ kubectl get pod -A

NAMESPACE        NAME                                               READY   STATUS      RESTARTS   AGE

ingress-nginx    ingress-nginx-admission-create-z4ff6               0/1     Completed   0          3m2s

ingress-nginx    ingress-nginx-admission-patch-pjdcd                0/1     Completed   1          3m2s

ingress-nginx    ingress-nginx-controller-fd7bb8d66-br28t           1/1     Running     0          3m2s

kube-system      coredns-558bd4d5db-nhq57                           1/1     Running     9          44d

kube-system      coredns-558bd4d5db-nlpbt                           1/1     Running     9          44d

kube-system      etcd-ras-k8s-m1.yun-craft.com                      1/1     Running     10         44d

kube-system      kube-apiserver-ras-k8s-m1.yun-craft.com            1/1     Running     10         44d

kube-system      kube-controller-manager-ras-k8s-m1.yun-craft.com   1/1     Running     10         44d

kube-system      kube-flannel-ds-bclt4                              1/1     Running     10         44d

kube-system      kube-flannel-ds-hq2b5                              1/1     Running     10         44d

kube-system      kube-flannel-ds-p47r6                              1/1     Running     10         44d

kube-system      kube-flannel-ds-rq75h                              1/1     Running     9          44d

kube-system      kube-proxy-cx4p4                                   1/1     Running     10         44d

kube-system      kube-proxy-k8jfh                                   1/1     Running     9          44d

kube-system      kube-proxy-z44hp                                   1/1     Running     10         44d

kube-system      kube-proxy-zjndc                                   1/1     Running     10         44d

kube-system      kube-scheduler-ras-k8s-m1.yun-craft.com            1/1     Running     10         44d

metallb-system   controller-6b78bff7d9-vq9hx                        1/1     Running     5          12d

metallb-system   speaker-9xkbz                                      1/1     Running     4          12d

metallb-system   speaker-rb8wg                                      1/1     Running     4          12d

metallb-system   speaker-rvvd7                                      1/1     Running     4          12d

metallb-system   speaker-vqd2l                                      1/1     Running     3          12d
これで、Kubernetesクラスターが自宅のRaspberry Pi×4台で完成しました。
まとめ
今回は、まず手始めにKubernetesクラスターの環境構築を「Raspberry Pi×4台」で実践してみました。ポイントは、最後の方のロードバランサーとIngressコントローラーの部分です。これらについては、オンプレミスで自前のネットワーク上でL7ロードバランサーを実現できることが重要ですが、この手の情報があまり世の中で見つからなかったため、色々試してできた実績を記載しています。
次回は、他にもRed Hat Enterprise Linux 7.9でRed Hatの公式リポジトリだけでどこまでのKubernetes環境ができるかどうか試してみたので、その時の構築手順を紹介します。
関連記事
REHL8におけるPodManによるルートレスコンテナ環境の構築方法
2021/11/30 13:05
Red…
Kali Linux 2021.2とKali Linuxのトップ10ツール
2021/06/27 11:05
2021年6月時点のKali Linuxの最新状況とKali Linux 2021.2のインストール手順とKali Linuxのトップ10ツールについて紹介します。
ペネトレーションテストの実験・練習環境を構築する
2021/04/07 21:49
Kali Linuxによるペネトレーションテスト環境(実際に攻撃の練習、実験を行う環境)として、Hyper-V上にMetasploitable2という脆弱性を多く含む仮想マシンを構築する方法を紹介します。
Kali Linux 2020.4のインストール手順(Raspberry Pi 4B版)
2021/02/23 21:57
Raspberry Pi 4BにKali Linux 2020.4を入れてみたときの手順を紹介します。
Kali Linux 2020.4 のインストール後の初期設定
2021/02/20 14:00
Kali Linux 2020.4のインストール後の初期設定の手順概要を紹介します。
Kali Linux 2020.4 インストール手順
2021/02/15 21:28
Kali Linux 2020.4のインストールの手順概要を紹介します。
Kali Linuxとは
2021/02/14 23:01
Kali Linux(カーリー・リナックス/カリ・リナックス)は、ペネトレーションテストを主な目的としているDebianベースのLinuxディストリビューションです。Kali…