にほんブログ村
| 目次 |
|---|
はじめに
Red Hat系Linuxのディストリビューションでは、バージョン8以降でコンテナ環境を構築する場合、dockerは非推奨となり、dockerの代わりにpodmanを使ってコンテナ環境を構築する必要があります。わざわざ非推奨のdockerを使用するよりは、今後はpodmanを使用したほうが良いと筆者は考え、podmanによるコンテナ環境の構築手順をここに示します。
なお、バージョンなどは執筆辞典のものですので、最新情報と差異があるかもしれませんが、ご参考までに。
OS(Red Hat Enterprise Linux 8.5)のインストール
ここでは、OS(Red Hat Enterprise Linux 8.5)のインストール手順から紹介します。バージョンが異なると、若干内容の変更があるかもしれません。
なお、Firewalldについては、この手順では、設定しません。必要に応じて設定してください。また、SELinuxについては、無効にするように設定しています。SELinuxを有効にする場合は、適切なパーミッション設定を行う必要があります。その他、RHELのサブスクリプションの登録やロケール・タイムゾーンの設定、およびネットワーク環境設定を適切に行う必要があります。これらの利用する環境によって異なる設定等についてもインストールや設定のノウハウとして記載していますので参考としてください。
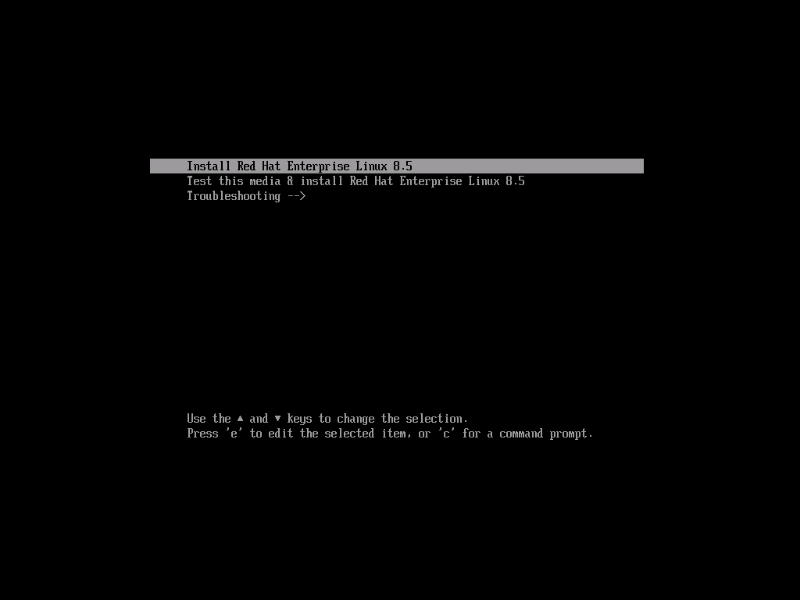
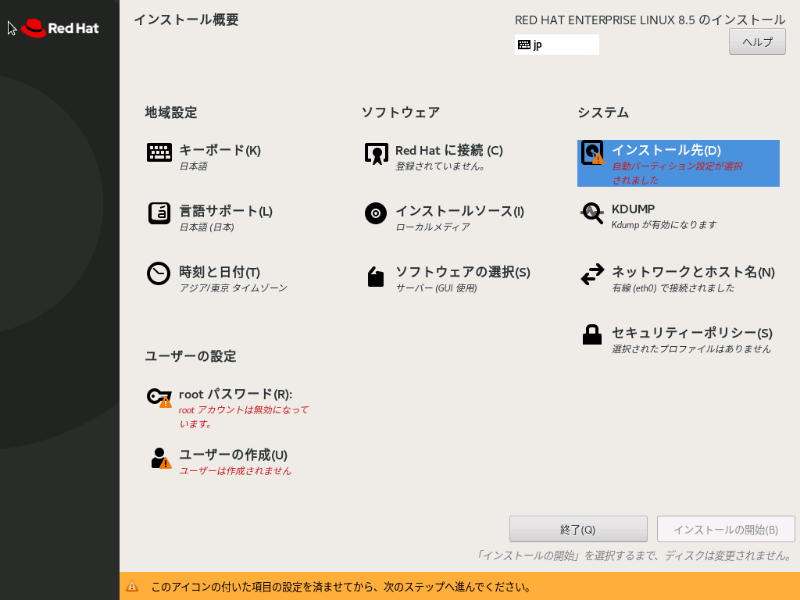
1 インストール開始
インストールメディアをインストール対象のサーバーに挿入し、起動します。 起動したら下図の画面で「Install Red Hat Enterprise Linux 8.5」を選択します。
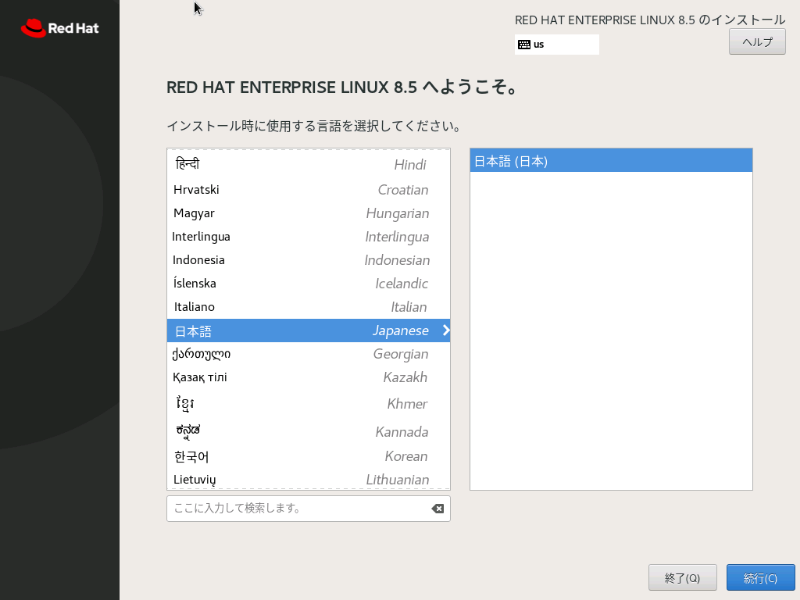
2 言語選択
インストール時に使用する言語を選択します。下図の画面で「日本語」→「日本語(日本)」を選択して「続行(C)」ボタンをクリックします。
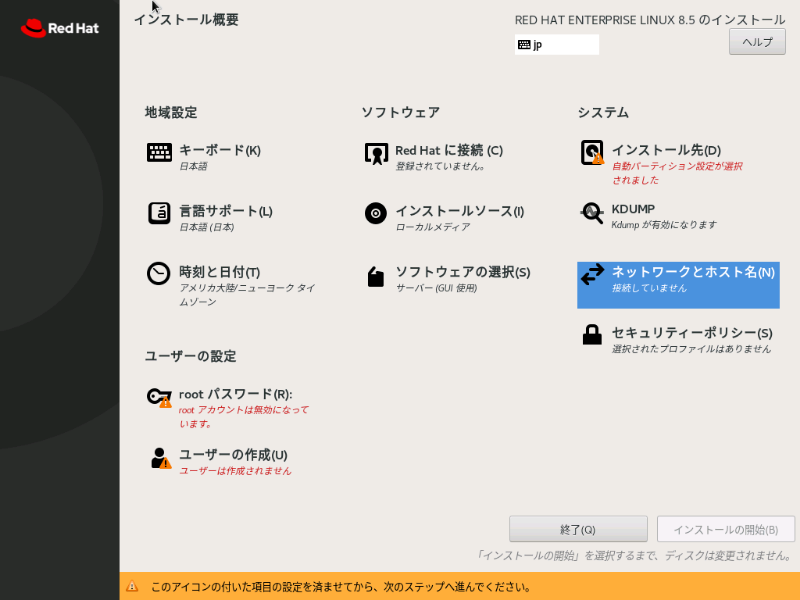
3 ネットワークとホスト名
下図のインストール概要画面で、「ネットワークとホスト名(N)」をクリックします。
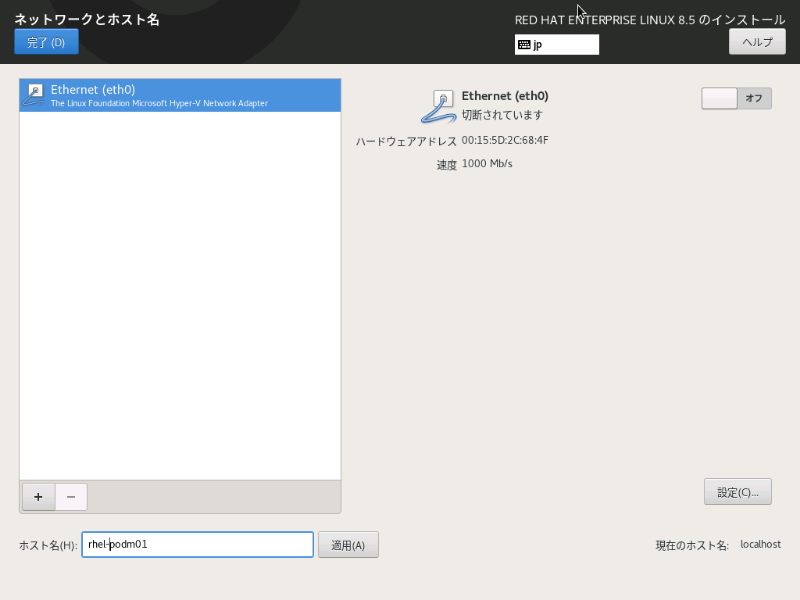
下図の画面で「ホスト名(H):」にサーバーのホスト名を入力し、「適用(A)」ボタンをクリックします。ネットワーク設定を行うNIC(Network Interface Card)を選択し、画面右下の「設定(C)」ボタンをクリックします。
下図の画面でNICのIPアドレス等を設定し、「保存(S)」ボタンをクリックします。
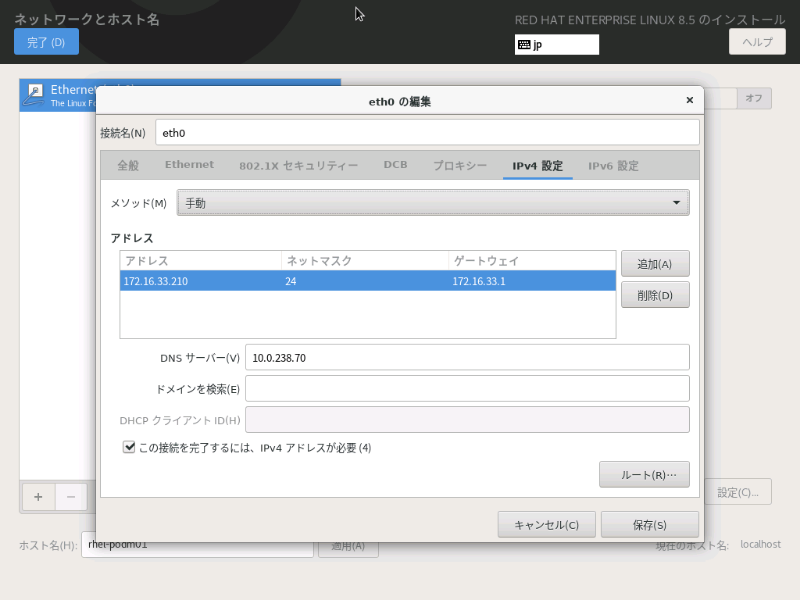
下図の画面で右上のスイッチを「オン」にして、設定したIPアドレス等が表示されることを確認し、「完了(D)」ボタンをクリックします。

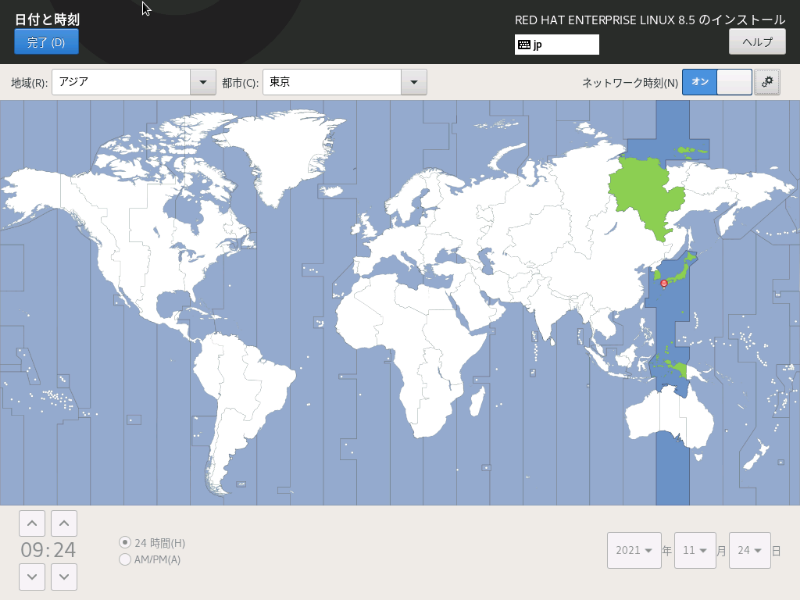
4 日付と時刻
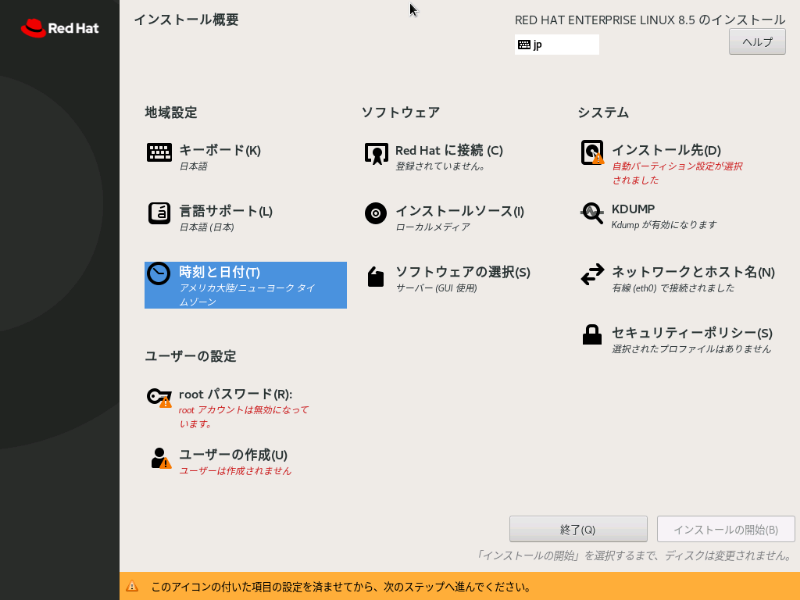
インストール概要画面(下図)で、「時刻と日付(T)」をクリックします。
下図の画面で、地域(R):「アジア」、都市(C):「東京」を選択してネットワーク時刻(N)の横の歯車ボタンをクリックします。
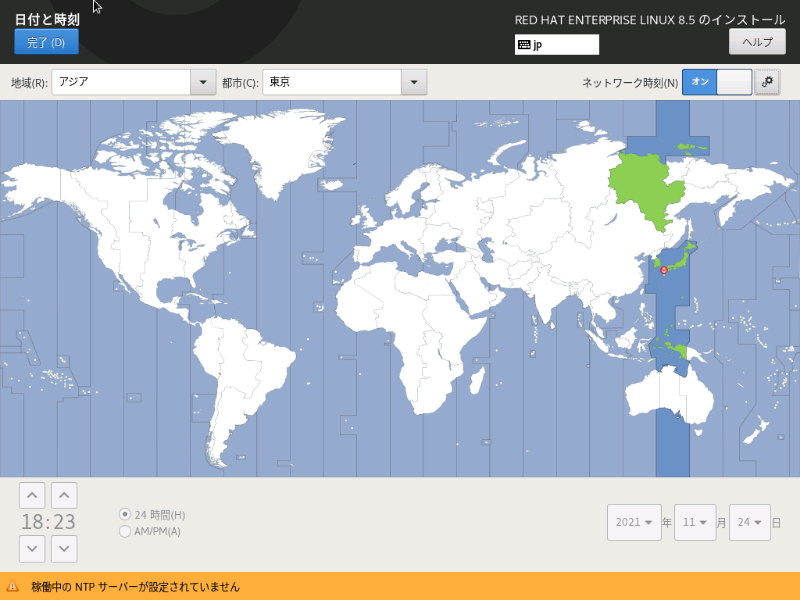
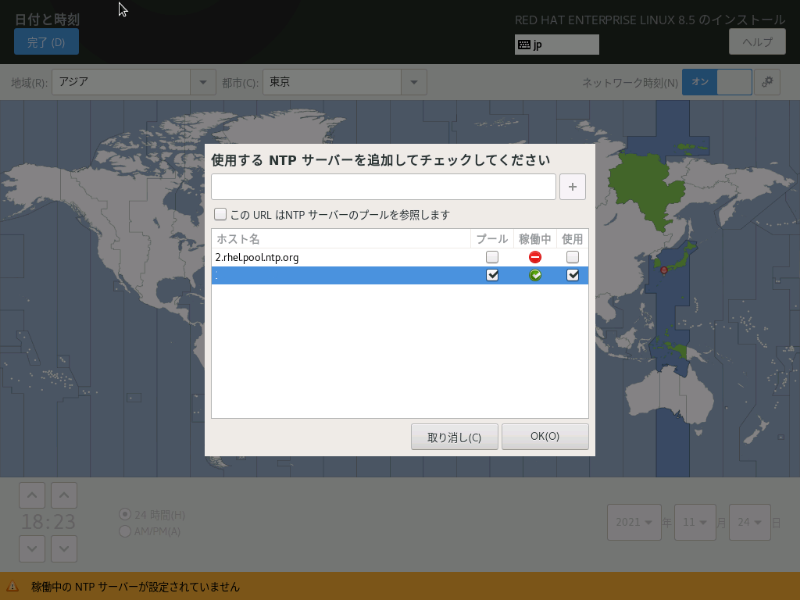
必要に応じて下図の画面でネットワーク時刻のオン/オフ設定を行います。(オンの場合、NTPサーバーの設定が必要です。)
下図の画面で、「完了(D)」ボタンをクリックします。
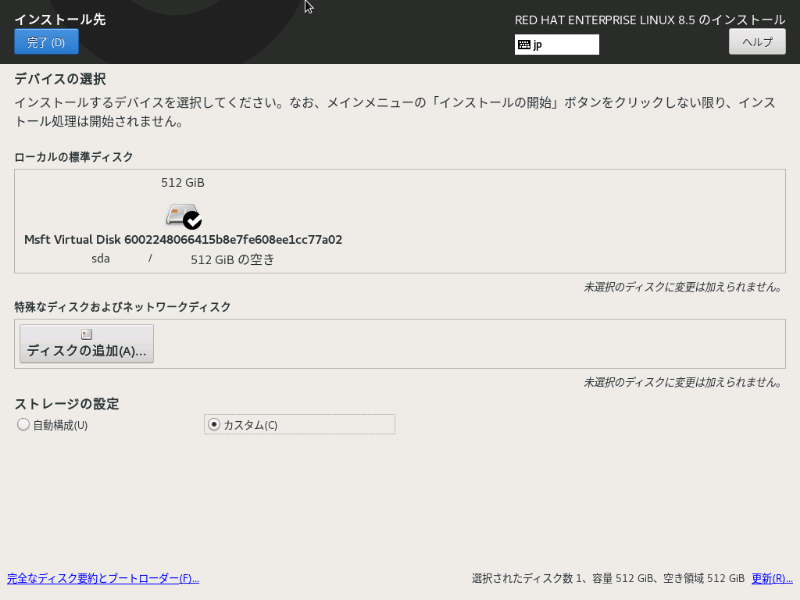
5 インストール先
インストール概要画面(下図)で、「インストール先(D)」をクリックします。
下図の画面の、ストレージの設定で「カスタム(C)」を選択して「完了(D)」ボタンをクリックします。
下図の画面の「ここをクリックすると自動的に作成します(C)。」をクリックします。

下図の画面で、「/home」を削除します。(/homeを選択して「-」ボタンをクリックします。)
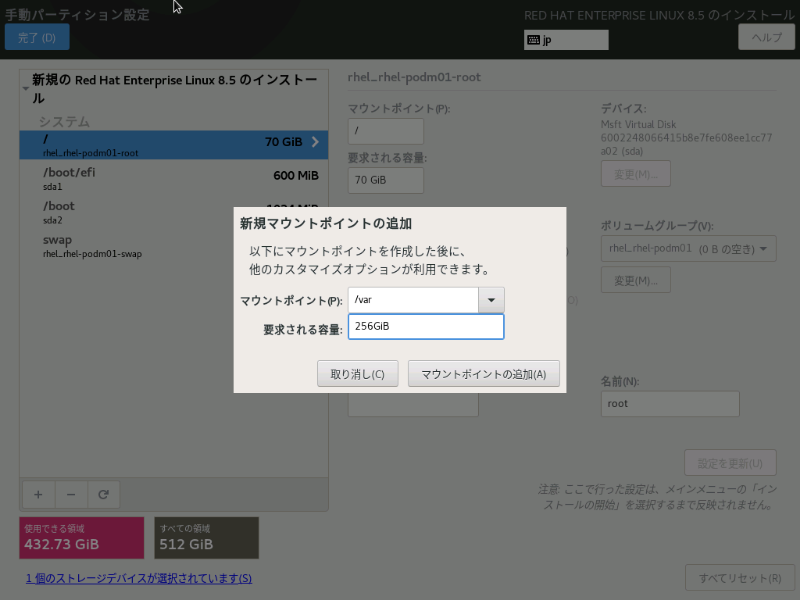
続いて、「/var」を「要求される容量(C):256GiB」で追加します。(「+」ボタンをクリックして、下図のダイアログで追加します。)
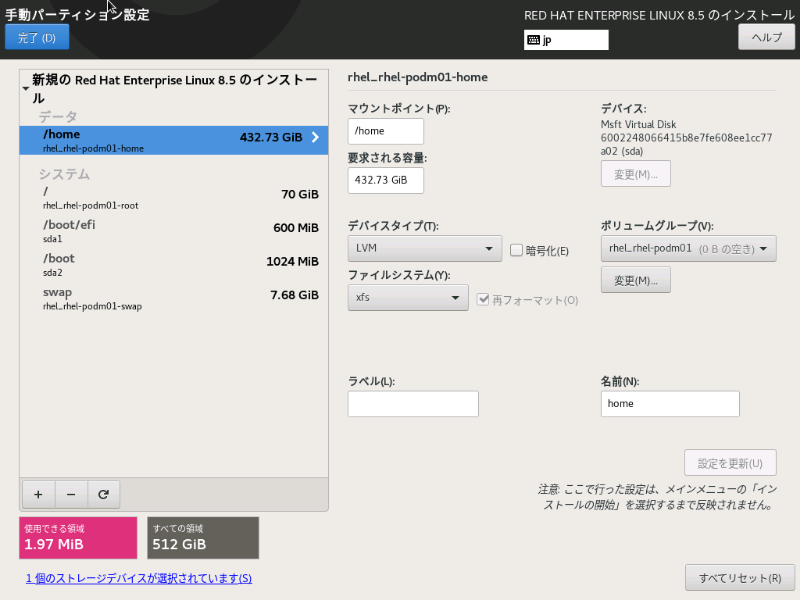
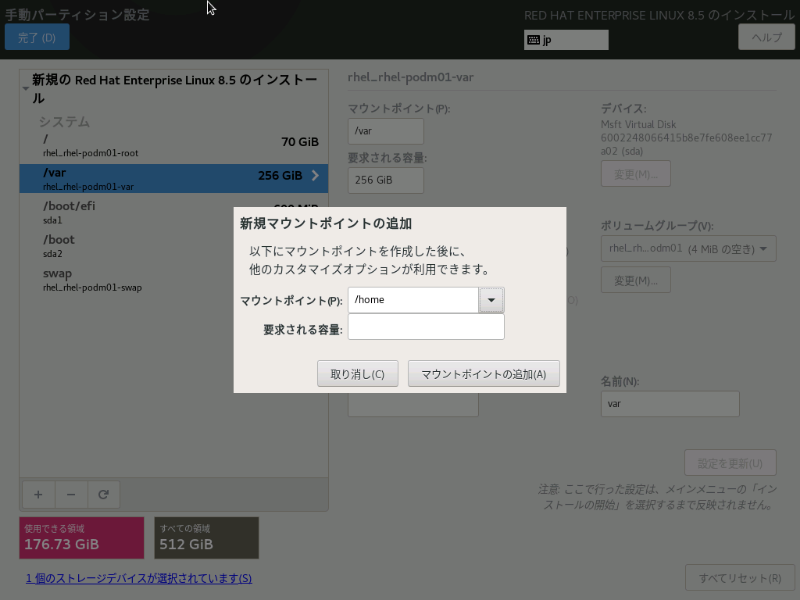
続いて、「/home」を「要求される容量(C):空白」で追加します。(同上の手順)これで残りすべてを/homeに割り当てます。
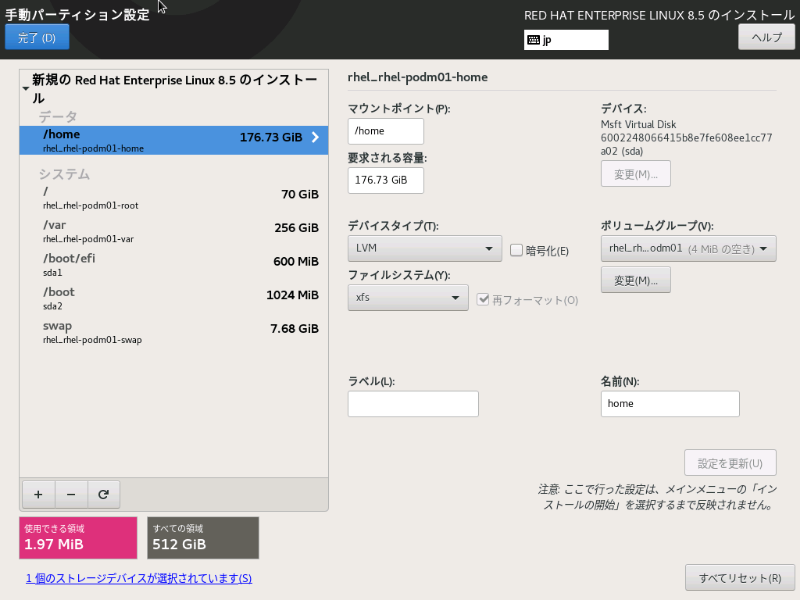
パーティションの手動設定ができると、下図のようになります。
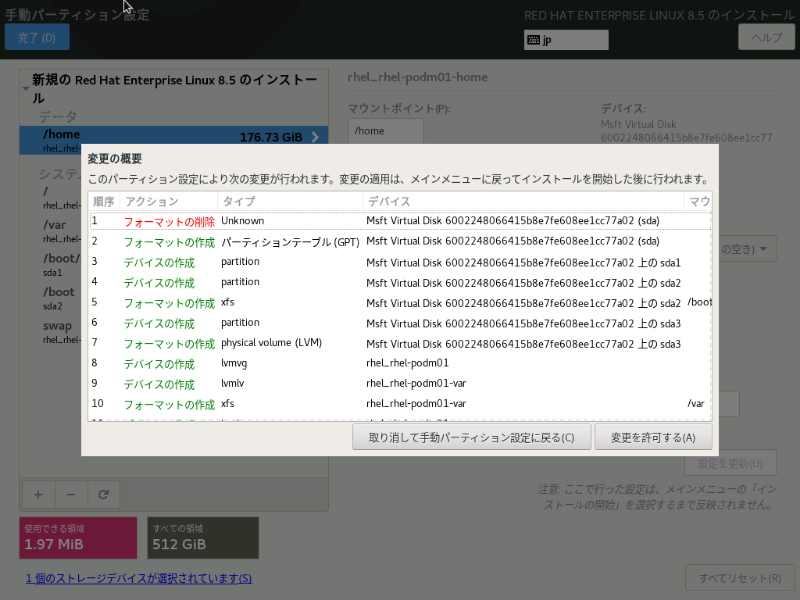
編集が終わったら「完了(D)」ボタンをクリックし、下図で「変更を許可する(A)」ボタンをクリックします。
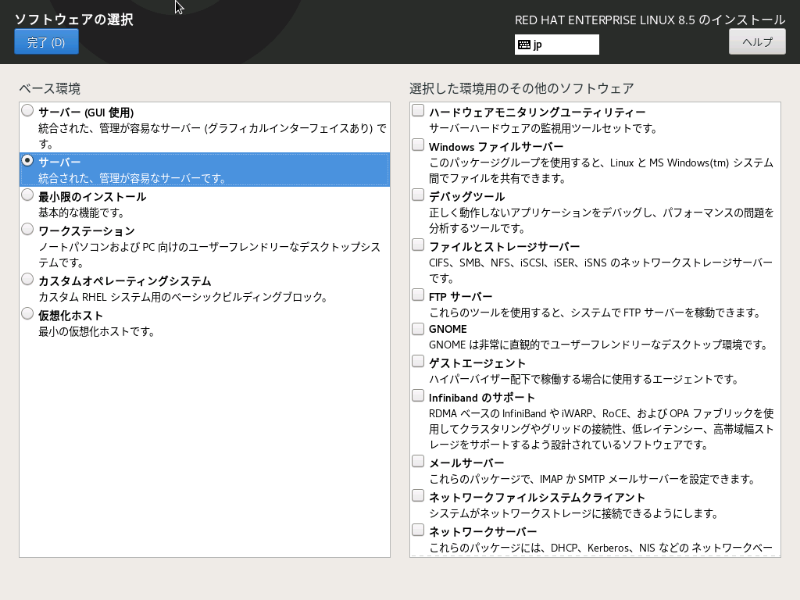
6 ソフトウェアの選択
インストール概要画面(下図)で、「ソフトウェアの選択(S)」をクリックします。
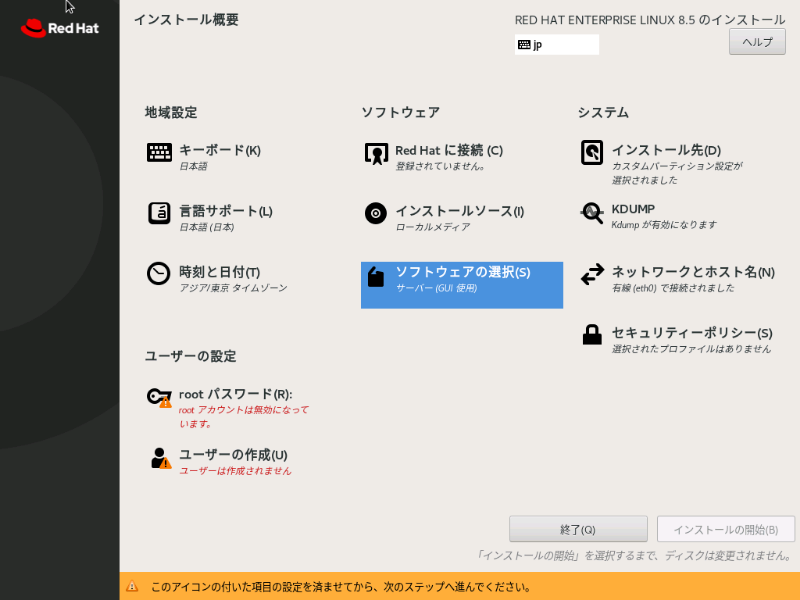
下図の画面で「サーバー」を選択して「完了(D)」ボタンをクリックします。なお、本書ではこの選択を推奨していますが、サーバーの運用環境や使用者のスキルによっては、「サーバー(GUI使用)」を選択することも可能です。また、画面左側の「選択した環境用のその他のソフトウェア」については、運用要件に合わせて必要なツールやソフトウェアを追加することも可能です。本書では、必要なソフトウェアは、後でインストールするので、ここでは特に何も追加しないでインストールを進めます。
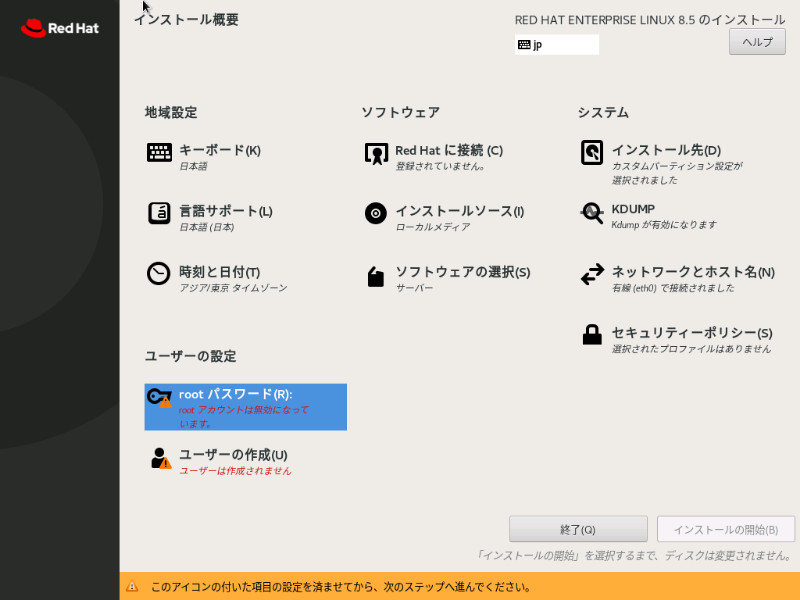
7 rootパスワードの設定
下図の画面で「rootパスワード(R)」をクリックします。
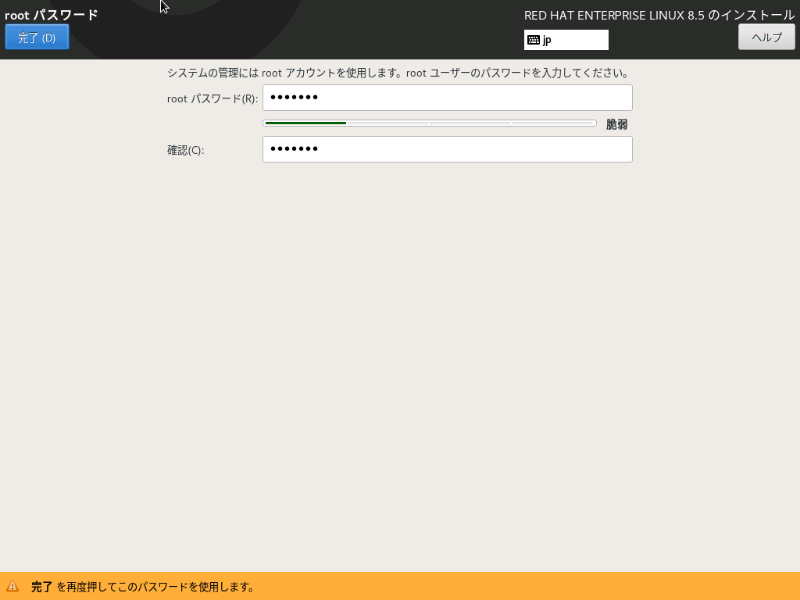
下図の画面でrootパスワードを入力します。
rootパスワード入力後、「完了(D)」ボタンをクリックします。単純なパスワードの場合、「完了(D)」ボタンを再度クリックする必要があります。
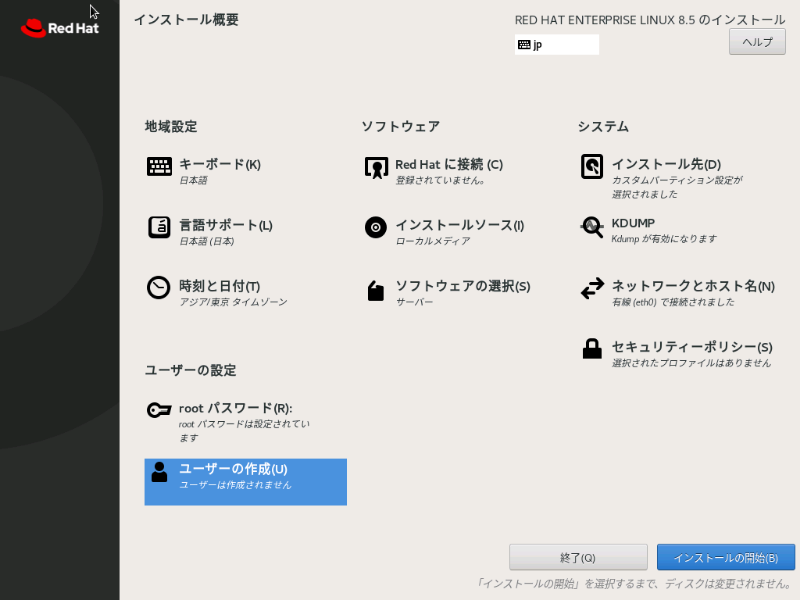
8 ユーザーの作成
下図の画面で「ユーザーの作成(U)」をクリックします。
下図の画面で、ユーザーを管理ユーザーとして追加します。
ユーザー名とパスワードを入力後、「完了(D)」ボタンをクリックします。単純なパスワードの場合、「完了(D)」ボタンを再度クリックする必要があります。

9 インストールの実行と完了
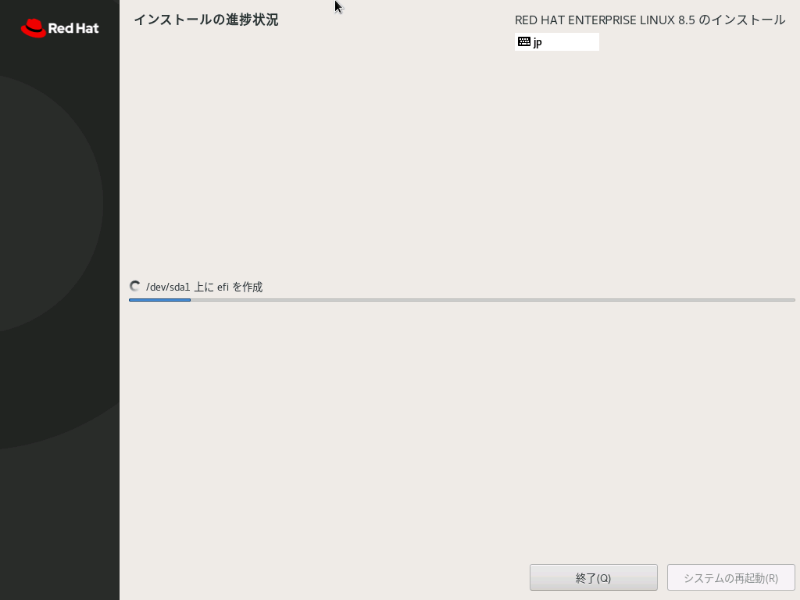
下図の画面で「インストールの開始(B)」ボタンをクリックします。その後、インストールが進みます。

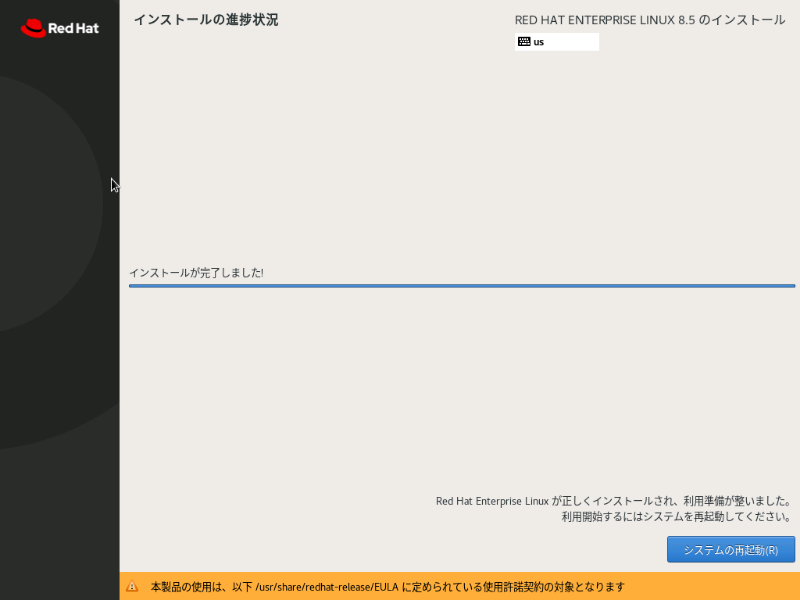
インストールが完了すると下図のような画面になります。「システムの再起動(R)」ボタンをクリックして再起動します。
再起動後は、下図のようにログイン状態になります。
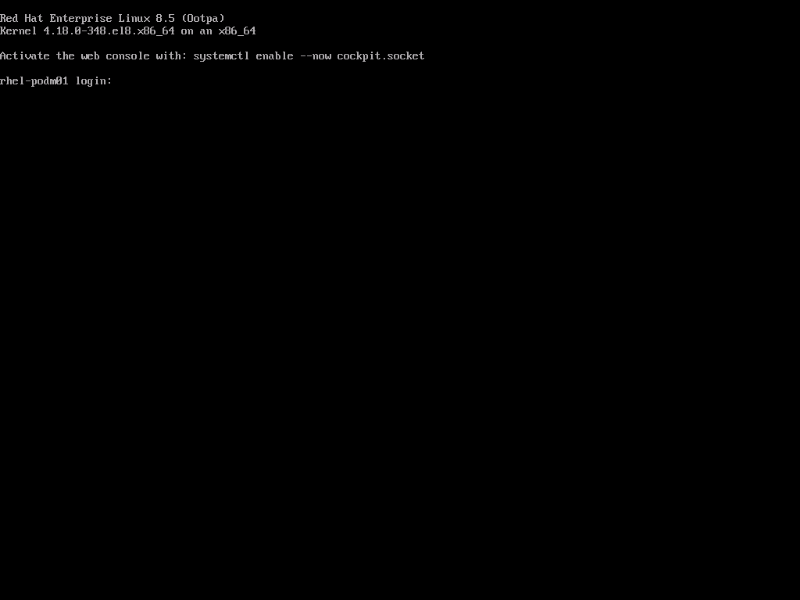
ここでrootユーザーでログインし、以下のコマンドを実行します。この操作によりcockpitというサーバー管理機能が実行されます。
# systemctl enable --now cockpit.socket
cockpitが起動していると以下のようにActive: active (running)となります。
# systemctl status cockpit.socket
● cockpit.socket - Cockpit Web Service Socket
   Loaded: loaded (/usr/lib/systemd/system/cockpit.socket; enabled; vendor preset: disabled)
   Active: active (running) since Wed 2021-11-24 09:47:57 JST; 6h ago
     Docs: man:cockpit-ws(8)
   Listen: [::]:9090 (Stream)
  Process: 6330 ExecStartPost=/bin/ln -snf active.motd /run/cockpit/motd (code=exited, status=0/SUCCESS)
  Process: 6322 ExecStartPost=/usr/share/cockpit/motd/update-motd  localhost (code=exited, status=0/SUCCESS)
    Tasks: 0 (limit: 98331)
   Memory: 644.0K
   CGroup: /system.slice/cockpit.socket

11月 24 09:47:57 rhel-podm01 systemd[1]: Starting Cockpit Web Service Socket.
11月 24 09:47:57 rhel-podm01 systemd[1]: Listening on Cockpit Web Service Socket.
他のPCから、以下のURLを参照すると、下図のようなcockpitのログイン画面が表示されます。
http://192.169.33.210:9090
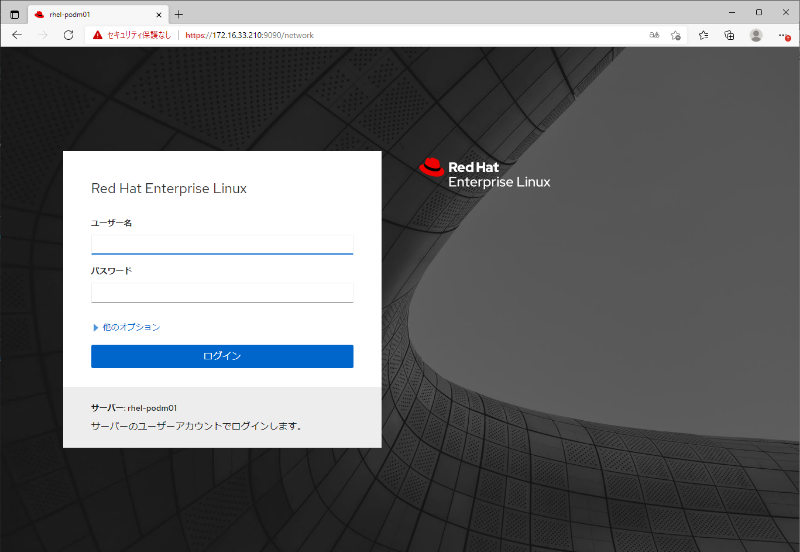
管理者権限のあるユーザーでログインすると、下図のような画面が表示されます。
以上で、OSのインストールは終わりです。次に、OSの基本設定を行います。
OSの基本設定
ここでは、OSの基本設定を行います。ここから先の手順では、すべてrootユーザーで行います。また、Red Hatのサブスクリプション登録や必須パッケージのインストールを行うため、インターネットに接続できる環境が前提となります。また、環境によっては、プロキシサーバー経由でのインターネット接続の場合もありますので、プロキシの設定についても記載しています。
1 プロキシの設定
プロキシ環境がない場合は不要な手順ですが、プロキシサーバー経由でのインターネット接続の場合、まず一番最初にプロキシ設定をしておく必要があります。以下の手順で、プロキシ設定を行います。必要に応じてプロキシのアカウント・パスワードを変更して設定してください。
例:
プロキシサーバー: xxx.proxy.yun-craft.com
ポート番号: 8080
プロキシユーザー名: mmmmmmm
プロキシユーザーのパスワード: pppppppp
・「/etc/dnf/dnf.conf」の変更
# vi /etc/dnf/dnf.conf
# 以下を追加します。
proxy=http://xxx.proxy.yun-craft.com:8080
proxy_username=mmmmmmm  # プロキシのアカウント取得したときのユーザー名(以下同様)
proxy_password=pppppppp # 上記のパスワード(以下同様)
・「/etc/profile.d/http_proxy.sh」の作成
# vi /etc/profile.d/http_proxy.sh
# 以下を新規に記述します。
export HTTP_PROXY=http://mmmmmmm:pppppppp@xxx.proxy.yun-craft.com:8080
export HTTPS_PROXY=http://mmmmmmm:pppppppp@xxx.proxy.yun-craft.com:8080
・「~/.curlrc」の作成
# vi ~/.curlrc
# 以下を追加
proxy=http://mmmmmmm:pppppppp@xxx.proxy.yun-craft.com:8080
・「/etc/rhsm/rhsm.conf」の編集
# vi /etc/rhsm/rhsm.conf
# an http proxy server to use
proxy_hostname = xxx.proxy.yun-craft.com

# port for http proxy server
proxy_port = 8080

# user name for authenticating to an http proxy, if needed
proxy_user = mmmmmmmmm

# password for basic http proxy auth, if needed
proxy_password = ppppppppppppp
2 サブスクリプション登録と割り当て
以下の手順で、Red Hatのサブスクリプションを登録します。この手順を行わないと、パッケージの追加や更新ができません。サブスクリプションは、以下のサイトを参照して事前に取得しておく必要があります。
[RHELの開発者用サブスクリプションを取得する方法(https://qiita.com/SkyLaptor/items/31eb7b506339718455d4)]
・サブスクリプション登録
# subscription-manager register
登録中: subscription.rhsm.redhat.com:443/subscription
ユーザー名: nnnnnnnn  # Red Hat アカウントのユーザー名(メールアドレスではない)
パスワード: pppppppp  # 登録したパスワードを入力
このシステムは、次の ID で登録されました: 237c9942-b859-4992-95c5-aaa4a3996a75
登録したシステム名: rhel-podm01
・サブスクリプションの状態確認
# subscription-manager list --available
+-------------------------------------------+
    利用可能なサブスクリプション
+-------------------------------------------+
サブスクリプション名:     Red Hat Developer Subscription for Individuals
提供:                     Red Hat Developer Tools (for RHEL Server for ARM)
                          Red Hat Software Collections (for RHEL Server for ARM)
                          Red Hat Ansible Engine
                          JBoss Enterprise Application Platform from RHUI
                          Red Hat CodeReady Linux Builder for IBM z Systems - Extended Update Support
                          Red Hat JBoss AMQ Interconnect
                          JBoss Enterprise Application Platform
                          JBoss Enterprise Web Server from RHUI
                          Red Hat Enterprise Linux for IBM z Systems - Extended Update Support
                          Red Hat Container Development Kit
                          Red Hat Beta
                          RHEL for SAP (for IBM Power LE) - Update Services for SAP Solutions
                          Red Hat OpenShift Container Platform
                          MRG Realtime
                          Red Hat JBoss Data Grid
                          dotNET on RHEL (for RHEL Server)
                          Red Hat CodeReady Linux Builder for x86_64 - Extended Update Support
                          Red Hat OpenShift Enterprise JBoss A-MQ add-on
                          Red Hat OpenShift Application Runtimes Beta
                          Red Hat Enterprise Linux High Availability - Update Services for SAP Solutions
                          Oracle Java (for RHEL Server)
                          Red Hat Enterprise Linux Resilient Storage for x86_64
                          Red Hat Software Collections (for RHEL Server)
                          Red Hat Enterprise Linux for ARM 64
                          JBoss Enterprise Web Platform
                          Red Hat Enterprise Linux for Real Time
                          Red Hat CodeReady Linux Builder for ARM 64
                          Red Hat Developer Tools (for RHEL Server)
                          Red Hat Developer Tools Beta (for RHEL Server)
                          Red Hat Enterprise Linux for x86_64
                          Red Hat Enterprise Linux Resilient Storage for IBM z Systems - Extended Update Support
                          Red Hat Enterprise Linux High Performance Networking (for RHEL Compute Node)
                          Red Hat S-JIS Support (for RHEL Server) - Extended Update Support
                          dotNET on RHEL Beta (for RHEL Server)
                          Red Hat CodeReady Linux Builder for x86_64
                          Red Hat Enterprise Linux for SAP HANA for x86_64
                          RHEL for SAP HANA - Update Services for SAP Solutions
                          Red Hat Enterprise Linux Scalable File System (for RHEL Server) - Extended Update Support
                          RHEL for SAP HANA - Extended Update Support
                          Red Hat Container Images Beta
                          Red Hat Ansible Automation Platform
                          Red Hat Enterprise Linux Atomic Host Beta
                          Red Hat JBoss Core Services
                          Red Hat Container Images
                          Red Hat Enterprise Linux Load Balancer (for RHEL Server)
                          Red Hat Developer Suite v.3
                          Red Hat CodeReady Workspaces for OpenShift
                          Red Hat OpenShift Enterprise JBoss EAP add-on
                          Red Hat Openshift Application Runtimes for IBM Power LE
                          Red Hat EUCJP Support (for RHEL Server) - Extended Update Support
                          Red Hat Enterprise Linux High Availability for x86_64
                          Red Hat Enterprise Linux Load Balancer (for RHEL Server) - Extended Update Support
                          Red Hat Openshift Application Runtimes
                          Red Hat Enterprise Linux High Availability (for IBM z Systems) - Extended Update Support
                          Red Hat Enterprise Linux Resilient Storage for x86_64 - Extended Update Support
                          Red Hat Enterprise Linux High Availability for x86_64 - Extended Update Support
                          Red Hat Enterprise Linux Server - Update Services for SAP Solutions
                          Red Hat JBoss Middleware
                          Red Hat Migration Toolkit
                          Red Hat Enterprise Linux High Performance Networking (for RHEL Server)
                          Red Hat Enterprise Linux Scalable File System (for RHEL Server)
                          Red Hat Enterprise Linux High Performance Networking (for RHEL Server) - Extended Update Support
                          Red Hat Enterprise Linux EUS Compute Node
                          RHEL for SAP - Update Services for SAP Solutions
                          Oracle Java (for RHEL Server) - Extended Update Support
                          Red Hat Enterprise Linux Atomic Host
                          OpenJDK Java (for Middleware)
                          JBoss Operations Network from RHUI
                          Red Hat JBoss AMQ Clients
                          Red Hat 3scale API Management Platform
                          Red Hat Software Collections Beta (for RHEL Server)
                          Red Hat Enterprise Linux Server
                          Red Hat Enterprise Linux for SAP Applications for x86_64
                          Red Hat Enterprise Linux for x86_64 - Extended Update Support
                          RHEL for SAP - Extended Update Support
                          Red Hat Developer Toolset (for RHEL Server)
                          Red Hat Software Collections Beta (for RHEL Server for ARM)
                          Red Hat JBoss Core Services from RHUI
                          Red Hat Developer Tools Beta (for RHEL Server for ARM)
                          Red Hat OpenShift Enterprise JBoss FUSE add-on
                          Red Hat Build of Quarkus
                          Red Hat OpenShift Enterprise JBoss EAP add-on Beta
SKU:                      RH00798
契約:
プール ID:                8a85f99b7cf074f3017d4ef170c424cf
管理の提供:               いいえ
数量:                     15
推奨:                     1
サービスタイプ:
ロール:                   Red Hat Enterprise Linux Server
                          Red Hat Enterprise Linux Workstation
                          Red Hat Enterprise Linux Compute Node
サービスレベル:           Self-Support
使用方法:                 Development/Test
アドオン:
サブスクリプションタイプ: Standard
開始:                     2021年11月23日
終了:                     2022年11月23日
エンタイトルメントタイプ: 物理

サブスクリプション名:     Red Hat Beta Access
提供:                     Red Hat CodeReady Linux Builder for x86_64 Beta
                          Red Hat Enterprise Linux for IBM z Systems Beta
                          Red Hat Enterprise Linux Fast Datapath Beta for Power, little endian
                          Red Hat Enterprise Linux Resilient Storage Beta
                          Red Hat Enterprise Linux for x86_64 Beta
                          Red Hat Enterprise Linux for Real Time for NFV Beta
                          Red Hat Enterprise Linux for Real Time Beta
                          Red Hat Enterprise Linux for SAP HANA for x86_64 Beta
                          Red Hat Directory Server Beta
                          Red Hat Enterprise Linux Advanced Virtualization Beta (for RHEL Server for IBM System Z)
                          Red Hat Enterprise Linux for SAP Applications for x86_64 Beta
                          Red Hat Enterprise Linux for SAP Applications for IBM z Systems Beta
                          Red Hat CodeReady Linux Builder for ARM 64 Beta
                          Red Hat Enterprise Linux for SAP Applications for Power, little endian Beta
                          Red Hat Enterprise Linux Fast Datapath Beta for x86_64
                          Red Hat Enterprise Linux Advanced Virtualization (for RHEL Server for IBM System Z)
                          Red Hat CodeReady Linux Builder for Power, little endian Beta
                          Red Hat CodeReady Linux Builder for IBM z Systems Beta
                          Red Hat Enterprise Linux High Availability Beta
                          Red Hat Enterprise Linux for Power, little endian Beta
                          Red Hat Enterprise Linux for ARM 64 Beta
                          Red Hat Certificate System Beta
                          Red Hat Enterprise Linux for SAP HANA for Power, little endian Beta
SKU:                      RH00069
契約:
プール ID:                8a85f99b7cf074f3017d4ef1728824d1
管理の提供:               いいえ
数量:                     無制限
推奨:                     1
サービスタイプ:           L1-L3
ロール:
サービスレベル:           Self-Support
使用方法:
アドオン:
サブスクリプションタイプ: Standard
開始:                     2021年11月23日
終了:                     2022年11月23日
エンタイトルメントタイプ: 物理
・サブスクリプションの割り当て
引数「--pool=」の値には、前の手順「subscription-manager list」で確認した「サブスクリプション名: Red Hat Developer Subscription for Individuals」の「プール ID」の値を使用します。以下は、筆者のプールIDの例です。
# subscription-manager subscribe --pool=8a85f99b7cf074f3017d4ef170c424cf
サブスクリプションが正しく割り当てられました: Red Hat Developer Subscription for Individuals
・参考: サブスクリプションの解除
開発環境や試験環境等でサブスクリプションが不要となった場合や割り当てるサブスクリプションを間違えた場合、以下の手順でサブスクリプションを解除します。
# subscription-manager unregister
登録の解除中: subscription.rhsm.redhat.com:443/subscription
システムの登録は解除されました。
なお、サブスクリプションを再登録する場合は、「subscription-manager register」から行う必要があります。
3 OSの初期設定
以下の手順で、OSの初期設定を行います。運用環境によっては、本手順に従わず、運用要件に合わせた設定も必要となります。(特にfirewalldとSELinux設定)従って、運用要件に合わせた設定を行ってください。
・初期環境のアップデート(必要な場合に行ってください。)
# dnf -y update
サブスクリプション管理リポジトリーを更新しています。
Red Hat Enterprise Linux 8 for x86_64 - BaseOS (RPMs)           7.8 MB/s |  41 MB     00:05
Red Hat Enterprise Linux 8 for x86_64 - AppStream (RPMs)        7.9 MB/s |  37 MB     00:04
依存関係が解決しました。

{中略}

完了しました!
・filrewalldの停止(必要な場合に行ってください。)
# systemctl stop firewalld
# systemctl disable firewalld
Removed /etc/systemd/system/multi-user.target.wants/firewalld.service.
Removed /etc/systemd/system/dbus-org.fedoraproject.FirewallD1.service.
・SELinuxの停止とリブート(必要な場合に行ってください。)
# vi /etc/selinux/config
# [以下を変更]
SELINUX=disabled   # ※enforcing→disabledに変更、設定を間違えると起動しなくなります。
# reboot
・ロケールとタイムゾーンの確認・設定(必要な場合に行ってください。)
# localectl
   System Locale: LANG=ja_JP.UTF-8
       VC Keymap: jp
      X11 Layout: jp
# timedatectl
               Local time: 木 2021-11-25 06:52:42 JST
           Universal time: 水 2021-11-24 21:52:42 UTC
                 RTC time: 水 2021-11-24 21:52:42
                Time zone: Asia/Tokyo (JST, +0900)
System clock synchronized: yes
              NTP service: active
          RTC in local TZ: no
上記の各コマンドの出力結果が異なっている場合、以下のようにロケールとタイムゾーンを変更します。
# localectl set-locale LANG=ja_JP.utf8
# timedatectl set-timezone Asia/Tokyo
コンテナ環境の構築
RHEL 8では、Dockerがサポートされなくなり、代わりにPodman等のコンテナツールが導入されています。ここでは、RHELが公式にサポートするコンテナ環境を構築しますs。
詳しくは、以下を参照してください。
[Red Hat Customer Portal: コンテナーの構築、実行、および管理(https://access.redhat.com/documentation/ja-jp/red_hat_enterprise_linux/8/html-single/building_running_and_managing_containers/index )]
1 コンテナツールのインストール
以下のようにコンテナツールをインストールします。(関連パッケージ等の依存関係も含めて以下に出力結果を示します。)
# dnf module install -y container-tools
サブスクリプション管理リポジトリーを更新しています。
メタデータの期限切れの最終確認: 1:09:32 時間前の 2021年11月25日 06時28分13秒 に 実施しました。
依存関係が解決しました。
================================================================================
 パッケージ     Arch   バージョン        リポジトリー                     サイズ
================================================================================
group/moduleパッケージをインストール:
 crun           x86_64 1.0-1.module+el8.5.0+12582+56d94c81
                                         rhel-8-for-x86_64-appstream-rpms 193 k
 python3-podman noarch 3.2.0-2.module+el8.5.0+12582+56d94c81
                                         rhel-8-for-x86_64-appstream-rpms 148 k
 skopeo         x86_64 1:1.4.2-0.1.module+el8.5.0+12582+56d94c81
                                         rhel-8-for-x86_64-appstream-rpms 6.7 M
 toolbox        x86_64 0.0.99.3-0.4.module+el8.5.0+12682+a4eeb084
                                         rhel-8-for-x86_64-appstream-rpms 2.3 M
 udica          noarch 0.2.5-2.module+el8.5.0+12582+56d94c81
                                         rhel-8-for-x86_64-appstream-rpms  51 k
依存関係のインストール:
 python3-pip    noarch 9.0.3-20.el8      rhel-8-for-x86_64-appstream-rpms  20 k
 python3-pytoml noarch 0.1.14-5.git7dea353.el8
                                         rhel-8-for-x86_64-appstream-rpms  25 k
 python3-pyxdg  noarch 0.25-16.el8       rhel-8-for-x86_64-appstream-rpms  94 k
 python36       x86_64 3.6.8-38.module+el8.5.0+12207+5c5719bc
                                         rhel-8-for-x86_64-appstream-rpms  19 k
 yajl           x86_64 2.1.0-10.el8      rhel-8-for-x86_64-appstream-rpms  41 k
モジュールプロファイルのインストール中:
 container-tools/common

モジュールストリームの有効化中:
 python36              3.6

トランザクションの概要
================================================================================
インストール  10 パッケージ

ダウンロードサイズの合計: 9.5 M
インストール後のサイズ: 34 M
パッケージのダウンロード:
(1/10): python3-pytoml-0.1.14-5.git7dea353.el8.  64 kB/s |  25 kB     00:00
(2/10): yajl-2.1.0-10.el8.x86_64.rpm            104 kB/s |  41 kB     00:00
(3/10): python3-pyxdg-0.25-16.el8.noarch.rpm    222 kB/s |  94 kB     00:00
(4/10): udica-0.2.5-2.module+el8.5.0+12582+56d9  64 kB/s |  51 kB     00:00
(5/10): python36-3.6.8-38.module+el8.5.0+12207+  68 kB/s |  19 kB     00:00
(6/10): toolbox-0.0.99.3-0.4.module+el8.5.0+126 2.0 MB/s | 2.3 MB     00:01
(7/10): crun-1.0-1.module+el8.5.0+12582+56d94c8 750 kB/s | 193 kB     00:00
(8/10): python3-podman-3.2.0-2.module+el8.5.0+1 602 kB/s | 148 kB     00:00
(9/10): skopeo-1.4.2-0.1.module+el8.5.0+12582+5 4.5 MB/s | 6.7 MB     00:01
(10/10): python3-pip-9.0.3-20.el8.noarch.rpm     84 kB/s |  20 kB     00:00
--------------------------------------------------------------------------------
合計                                            4.8 MB/s | 9.5 MB     00:02
トランザクションの確認を実行中
トランザクションの確認に成功しました。
トランザクションのテストを実行中
トランザクションのテストに成功しました。
トランザクションを実行中
  準備             :                                                        1/1
  インストール中   : python3-pip-9.0.3-20.el8.noarch                       1/10
  インストール中   : python36-3.6.8-38.module+el8.5.0+12207+5c5719bc.x8    2/10
  scriptletの実行中: python36-3.6.8-38.module+el8.5.0+12207+5c5719bc.x8    2/10
  インストール中   : yajl-2.1.0-10.el8.x86_64                              3/10
  インストール中   : python3-pyxdg-0.25-16.el8.noarch                      4/10
  インストール中   : python3-pytoml-0.1.14-5.git7dea353.el8.noarch         5/10
  インストール中   : python3-podman-3.2.0-2.module+el8.5.0+12582+56d94c    6/10
  インストール中   : crun-1.0-1.module+el8.5.0+12582+56d94c81.x86_64       7/10
  インストール中   : udica-0.2.5-2.module+el8.5.0+12582+56d94c81.noarch    8/10
  インストール中   : toolbox-0.0.99.3-0.4.module+el8.5.0+12682+a4eeb084    9/10
  インストール中   : skopeo-1:1.4.2-0.1.module+el8.5.0+12582+56d94c81.x   10/10
  scriptletの実行中: skopeo-1:1.4.2-0.1.module+el8.5.0+12582+56d94c81.x   10/10
  検証             : python3-pytoml-0.1.14-5.git7dea353.el8.noarch         1/10
  検証             : python3-pyxdg-0.25-16.el8.noarch                      2/10
  検証             : yajl-2.1.0-10.el8.x86_64                              3/10
  検証             : skopeo-1:1.4.2-0.1.module+el8.5.0+12582+56d94c81.x    4/10
  検証             : toolbox-0.0.99.3-0.4.module+el8.5.0+12682+a4eeb084    5/10
  検証             : udica-0.2.5-2.module+el8.5.0+12582+56d94c81.noarch    6/10
  検証             : python36-3.6.8-38.module+el8.5.0+12207+5c5719bc.x8    7/10
  検証             : crun-1.0-1.module+el8.5.0+12582+56d94c81.x86_64       8/10
  検証             : python3-podman-3.2.0-2.module+el8.5.0+12582+56d94c    9/10
  検証             : python3-pip-9.0.3-20.el8.noarch                      10/10
インストール済みの製品が更新されています。

インストール済み:
  crun-1.0-1.module+el8.5.0+12582+56d94c81.x86_64
  python3-pip-9.0.3-20.el8.noarch
  python3-podman-3.2.0-2.module+el8.5.0+12582+56d94c81.noarch
  python3-pytoml-0.1.14-5.git7dea353.el8.noarch
  python3-pyxdg-0.25-16.el8.noarch
  python36-3.6.8-38.module+el8.5.0+12207+5c5719bc.x86_64
  skopeo-1:1.4.2-0.1.module+el8.5.0+12582+56d94c81.x86_64
  toolbox-0.0.99.3-0.4.module+el8.5.0+12682+a4eeb084.x86_64
  udica-0.2.5-2.module+el8.5.0+12582+56d94c81.noarch
  yajl-2.1.0-10.el8.x86_64

完了しました!
2 Podman-dockerのインストール
podman-dockerパッケージをインストールします。podman-dockerは、Dockerコマンドとdocker-apiを、同等のPodmanコマンドに置き換えるパッケージです。
# dnf install -y podman-docker
サブスクリプション管理リポジトリーを更新しています。
メタデータの期限切れの最終確認: 1:15:51 時間前の 2021年11月25日 06時28分13秒 に 実施しました。
依存関係が解決しました。
================================================================================
 パッケージ    Arch   バージョン         リポジトリー                     サイズ
================================================================================
インストール:
 podman-docker noarch 3.3.1-9.module+el8.5.0+12697+018f24d7
                                         rhel-8-for-x86_64-appstream-rpms  56 k

トランザクションの概要
================================================================================
インストール  1 パッケージ

ダウンロードサイズの合計: 56 k
インストール後のサイズ: 230
パッケージのダウンロード:
podman-docker-3.3.1-9.module+el8.5.0+12697+018f 141 kB/s |  56 kB     00:00
--------------------------------------------------------------------------------
合計                                            141 kB/s |  56 kB     00:00
トランザクションの確認を実行中
トランザクションの確認に成功しました。
トランザクションのテストを実行中
トランザクションのテストに成功しました。
トランザクションを実行中
  準備             :                                                        1/1
  インストール中   : podman-docker-3.3.1-9.module+el8.5.0+12697+018f24d7.   1/1
  scriptletの実行中: podman-docker-3.3.1-9.module+el8.5.0+12697+018f24d7.   1/1
  検証             : podman-docker-3.3.1-9.module+el8.5.0+12697+018f24d7.   1/1
インストール済みの製品が更新されています。

インストール済み:
  podman-docker-3.3.1-9.module+el8.5.0+12697+018f24d7.noarch

完了しました!
・dockerコマンド実行時のメッセージを消す
dockerコマンドを実行するたびに「Emulate Docker CLI using podman. Create /etc/containers/nodocker to quiet msg.」というメッセージが出力されるので、以下のようにしてメッセージを抑止します。
# touch /etc/containers/nodocker
3 バージョン確認
以下のようにバージョンを確認します。
# podman --version
podman version 3.3.1
# podman version
Version:      3.3.1
API Version:  3.3.1
Go Version:   go1.16.7
Built:        Tue Sep 21 17:41:42 2021
OS/Arch:      linux/amd64
なお、「podman」を「docker」に置き換えても同じ結果が得られます。
# docker --version
podman version 3.3.1
# docker version
Version:      3.3.1
API Version:  3.3.1
Go Version:   go1.16.7
Built:        Tue Sep 21 17:41:42 2021
OS/Arch:      linux/amd64
4 コンテナ展開場所の設定(参考)
以下の設定により、必要に応じてコンテナを展開するパスを指定します。デフォルトは、「/var/lib/containers」ですが、パーティション容量等のシステム構成上の都合により設定変更が必要となる場合は、以下の設定を行う必要があります。なお、本書のインストール手順では、「/var」パーティションに256GBの容量を割り当てているため、本手順は不要ですが、もし他のパス(以下の例は、「/home/containers」)に設定を変更する必要がある場合は、以下の手順を行います。
また、一般ユーザーでルートレスでコンテナを使用する場合、「$HOME/.local/share/containers/storage/」が使用されます。
ルートレスのコンテナ環境の設定ファイルは、「$HOME/.config/containers/」に作成します。
1)変更先のディレクトリの作成
# mkdir /home/containers
# mkdir /home/containers/cache
# mkdir /home/containers/sigstore
# mkdir /home/containers/storage
2)設定変更
# vi /etc/containers/storage.conf
# 以下を変更します。
# Primary Read/Write location of container storage
# graphroot = "/var/lib/containers/storage"
graphroot = "/home/containers/storage"
上記の設定ファイルを変更した時点で、「docker run」や「docker ps」は、上記の変更したパスを元に実行されます。
5 コンテナツールAPIの設定
docker-composeを使用できるようにするために、コンテナツールAPIをインストールし、設定します。
# dnf install podman-remote -y
サブスクリプション管理リポジトリーを更新しています。

{中略}

インストール済み:
  podman-remote-3.3.1-9.module+el8.5.0+12697+018f24d7.x86_64

完了しました!
systemdを再読み込みし、サービスを実行します。
# systemctl daemon-reload
[root@rhel-podm01 ~]# systemctl enable --now podman.socket
Created symlink /etc/systemd/system/sockets.target.wants/podman.socket → /usr/lib/systemd/system/podman.socket.
Podmanのシステム情報を確認します。
# podman-remote info
host:
  arch: amd64
  buildahVersion: 1.22.3
  cgroupControllers:
  - cpuset
  - cpu

{中略}

  runRoot: /run/containers/storage
  volumePath: /var/lib/containers/storage/volumes
version:
  APIVersion: 3.3.1
  Built: 1632213702
  BuiltTime: Tue Sep 21 17:41:42 2021
  GitCommit: ""
  GoVersion: go1.16.7
  OsArch: linux/amd64
  Version: 3.3.1
APIを実際に実行して動作を確認します。
# curl -s --unix-socket /run/podman/podman.sock http://d/v3.0.0/libpod/info | jq .version
{
  "APIVersion": "3.3.1",
  "Version": "3.3.1",
  "GoVersion": "go1.16.7",
  "GitCommit": "",
  "BuiltTime": "Tue Sep 21 17:41:42 2021",
  "Built": 1632213702,
  "OsArch": "linux/amd64"
}
6 Podman-pluginsのインストール
Podmanのプラグインをインストールします。
# dnf install -y podman-plugins
サブスクリプション管理リポジトリーを更新しています。

{中略}

インストール済み:
  dnsmasq-2.79-19.el8.x86_64              podman-gvproxy-3.3.1-9.module+el8.5.0+12697+018f24d7.x86_64              podman-plugins-3.3.1-9.module+el8.5.0+12697+018f24d7.x86_64

完了しました!
7 docker-composeのインストール
docker-composeのインストール方法はいくつかありますが、ここでは、本家サイトからバイナリをダウンロードして使用する方法とします。
# curl -L "https://github.com/docker/compose/releases/download/1.29.2/docker-compose-$(uname -s)-$(uname -m)" -o /usr/local/bin/docker-compose
  % Total    % Received % Xferd  Average Speed   Time    Time     Time  Current
                                 Dload  Upload   Total   Spent    Left  Speed
100   633  100   633    0     0   4586      0 --:--:-- --:--:-- --:--:--  4586
100 12.1M  100 12.1M    0     0  7116k      0  0:00:01  0:00:01 --:--:-- 9809k
# chmod +x /usr/local/bin/docker-compose
参考:docker-composeのインストール方法
- 本家サイトからバイナリをダウンロード
- pip3によるインストール(python環境に影響あり)
- docker-composeのコンテナイメージからコンテナ起動
8 docker-composerを使用するユーザーの設定
docker-composerを使用する一般ユーザーは、ユーザー自身で以下の設定を行う必要があります。
$ systemctl --user daemon-reload
$ systemctl --user enable --now podman.socket
また、以下のように環境を追加します。(注意: 以下の1000はユーザーIDですので、環境によっては数字が変わります)
$ vi ~/.bash_profile
# 以下を追加
export DOCKER_HOST=unix:/run/user/1000/podman/podman.sock
追加した環境変数を適用します。
$ source ~/.bash_profile
上記の「/run/user/1000/podman/podman.sock」(ユーザーID含む)は、以下で確認できます。
$ systemctl --user status podman.socket
● podman.socket - Podman API Socket
   Loaded: loaded (/usr/lib/systemd/user/podman.socket; enabled; vendor preset: enabled)
   Active: active (listening) since Mon 2021-08-16 01:16:36 JST; 26s ago
     Docs: man:podman-system-service(1)
   Listen: /run/user/1000/podman/podman.sock (Stream)   # ★この部分
   CGroup: /user.slice/user-1000.slice/user@1000.service/podman.socket

 8月 16 01:16:36 localhost.localdomain systemd[12425]: Listening on Podman API Socket.
9 コンテナの動作テスト
以下のように、「一般ユーザー」でコンテナの各種操作ができることを確認します。(ルートレスコンテナとしての動作確認を行います。)
・イメージの取得
$ podman pull registry.access.redhat.com/ubi8/ubi
Trying to pull registry.access.redhat.com/ubi8/ubi:latest...
Getting image source signatures
Checking if image destination supports signatures
Copying blob 63f9f4c31162 done
Copying blob ce3c6836540f done
Copying config cc06568478 done
Writing manifest to image destination
Storing signatures
cc0656847854310306093b3dc1a7d9e7fc06399da46853e0c921cd5ec1906bfd
・イメージの参照
$ podman images
REPOSITORY                           TAG         IMAGE ID      CREATED      SIZE
registry.access.redhat.com/ubi8/ubi  latest      cc0656847854  3 weeks ago  235 MB
・コンテナの実行
$ podman run --name=myubi registry.access.redhat.com/ubi8/ubi cat /etc/os-release
NAME="Red Hat Enterprise Linux"
VERSION="8.5 (Ootpa)"
ID="rhel"
ID_LIKE="fedora"
VERSION_ID="8.5"
PLATFORM_ID="platform:el8"
PRETTY_NAME="Red Hat Enterprise Linux 8.5 (Ootpa)"
ANSI_COLOR="0;31"
CPE_NAME="cpe:/o:redhat:enterprise_linux:8::baseos"
HOME_URL="https://www.redhat.com/"
DOCUMENTATION_URL="https://access.redhat.com/documentation/red_hat_enterprise_linux/8/"
BUG_REPORT_URL="https://bugzilla.redhat.com/"

REDHAT_BUGZILLA_PRODUCT="Red Hat Enterprise Linux 8"
REDHAT_BUGZILLA_PRODUCT_VERSION=8.5
REDHAT_SUPPORT_PRODUCT="Red Hat Enterprise Linux"
REDHAT_SUPPORT_PRODUCT_VERSION="8.5"
・コンテナへの出入り
$ podman run -d -it --name=myubi2 registry.access.redhat.com/ubi8/ubi
11bc295e20d1db8e72cec05442675078defcb50fa549cd529388ecea7dec7a75
$ podman exec -it myubi2 bash
[root@11bc295e20d1 /]# cat /etc/os-release
NAME="Red Hat Enterprise Linux"
VERSION="8.5 (Ootpa)"
ID="rhel"
ID_LIKE="fedora"
VERSION_ID="8.5"
PLATFORM_ID="platform:el8"
PRETTY_NAME="Red Hat Enterprise Linux 8.5 (Ootpa)"
ANSI_COLOR="0;31"
CPE_NAME="cpe:/o:redhat:enterprise_linux:8::baseos"
HOME_URL="https://www.redhat.com/"
DOCUMENTATION_URL="https://access.redhat.com/documentation/red_hat_enterprise_linux/8/"
BUG_REPORT_URL="https://bugzilla.redhat.com/"

REDHAT_BUGZILLA_PRODUCT="Red Hat Enterprise Linux 8"
REDHAT_BUGZILLA_PRODUCT_VERSION=8.5
REDHAT_SUPPORT_PRODUCT="Red Hat Enterprise Linux"
REDHAT_SUPPORT_PRODUCT_VERSION="8.5"
[root@11bc295e20d1 /]# exit
exit
$
10 docker-composeの動作テスト
・docker-composeの利用
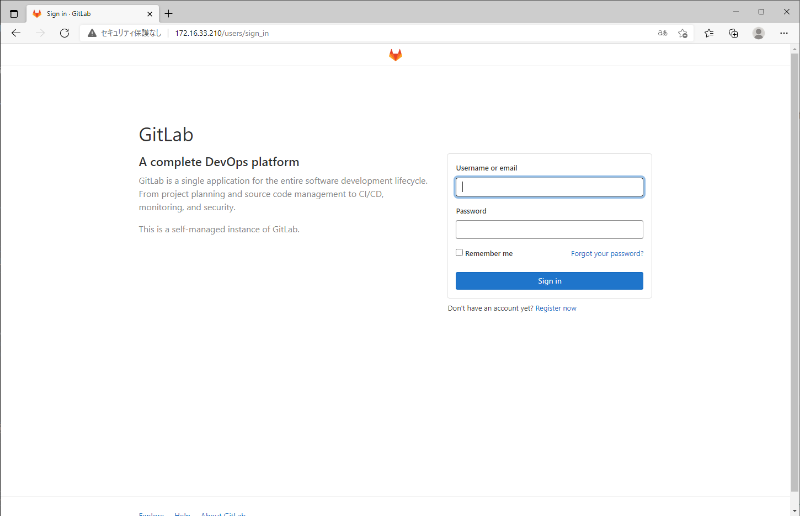
docker-composeが動作するか確認するために、以下のようにGitLabのコンテナを作成して実行します。
# mkdir gitlab && cd gitlab
# vi docker-compose.yml
・docker-compose.yml
version: '3'
services:
  gitLab:
    image: gitlab/gitlab-ce:latest
    restart: always
    hostname: 'gitlab'
    environment:
      GITLAB_OMNIBUS_CONFIG: |
        external_url 'http://0.0.0.0'
        gitlab_rails['gitlab_shell_ssh_port'] = 4022
    ports:
     - "80:80"
     - "443:443"
     - "4022:22"
    volumes:
     - './gitlab/config:/etc/gitlab'
     - './gitlab/logs:/var/log/gitlab'
     - './gitlab/data:/var/opt/gitlab'
# docker-compose up -d
数分まって「http://ホスト名」にアクセスすると、ログイン画面が表示されます。
以上で、コンテナ環境の構築は終わりです。
その他ノウハウ
本記事に関連して、以下のノウハウを記します。
1 RHELが使用できるレジストリ
RHELのPodmanはイメージを取得するレジストリがdocker.io以外にも複数あります。
$ podman pull mysql
? Please select an image:
  ? registry.fedoraproject.org/mysql:latest
    registry.access.redhat.com/mysql:latest
    registry.centos.org/mysql:latest
    docker.io/library/mysql:latest
(↑カーソルキーで選択します。)
dockerhubに登録したユーザーでイメージをpullする場合には、「docker login docker.io」のようにログイン先を指定する必要があります。ログイン先(「docker.io」など)を指定しないと「registry.fedoraproject.org」へのログインとなるようです。「docker logout」も同様です。
2 RHELのOSイメージ
RHELでは、OSのイメージとしてUBI(Universal Base Images)を使用することで、コンテナイメージもRHELになり、サポートの対象となります。イメージのバージョンも7,8それぞれあり、使用目的でイメージを選択することもできます。
参照:
[Red Hat Customer Portal 第2章 コンテナーイメージの種類(https://access.redhat.com/documentation/ja-jp/red_hat_enterprise_linux/8/html/building_running_and_managing_containers/assembly_types-of-container-images_building-running-and-managing-containers )]
以下はUBIの使用例です。
# podman pull registry.access.redhat.com/ubi8/ubi
Trying to pull registry.access.redhat.com/ubi8/ubi:latest...
Getting image source signatures
Checking if image destination supports signatures
Copying blob 63f9f4c31162 done
Copying blob ce3c6836540f done
Copying config cc06568478 done
Writing manifest to image destination
Storing signatures
cc0656847854310306093b3dc1a7d9e7fc06399da46853e0c921cd5ec1906bfd
# podman run --name=myubi registry.access.redhat.com/ubi8/ubi cat /etc/os-release
NAME="Red Hat Enterprise Linux"
VERSION="8.5 (Ootpa)"
ID="rhel"
ID_LIKE="fedora"
VERSION_ID="8.5"
PLATFORM_ID="platform:el8"
PRETTY_NAME="Red Hat Enterprise Linux 8.5 (Ootpa)"
ANSI_COLOR="0;31"
CPE_NAME="cpe:/o:redhat:enterprise_linux:8::baseos"
HOME_URL="https://www.redhat.com/"
DOCUMENTATION_URL="https://access.redhat.com/documentation/red_hat_enterprise_linux/8/"
BUG_REPORT_URL="https://bugzilla.redhat.com/"

REDHAT_BUGZILLA_PRODUCT="Red Hat Enterprise Linux 8"
REDHAT_BUGZILLA_PRODUCT_VERSION=8.5
REDHAT_SUPPORT_PRODUCT="Red Hat Enterprise Linux"
REDHAT_SUPPORT_PRODUCT_VERSION="8.5"
3 今後のdokcer-compose
以下の記事によると、今後「dokcer-compose」はサポートされなくなるようです。
参考: [GitHub podman(https://github.com/containers/podman#out-of-scope)]
要約すると、「docker-compose」はサポートせず、Podmanプロジェクトでは、Kubernetes がコンテナオーケストレータのデファクトスタンダードであると考えています。よって、Podman にも コンテナ/ポッドに基づいた「Kubernetes YAML」ファイルの生成と、逆に「Kubernetes YAML」ファイルに基づいてコンテナ/ポッドを実行することを可能としたようです。
今のところ「docker-compose」も動作し、サードパーティ製の「podman-compose」は存在しているようですが、「Kubernetes YAML」によるコンテナオーケストレーションに前向きな考えを示しており、「docker-compose」が担っていたポジションもこれに統合したいようです。
今後は、「docker-compose」による複数コンテナの管理よりも「Kubernetes YAML」によるPodの作成・管理へシフトしていったほうがよさそうです。
参考:[(https://qiita.com/thirdpenguin/items/c9e58c27e96f02b0a96d)]
まとめ
今回は、Red Hat Enterprise Linux 8のOSのインストールからコンテナ環境(podmanとdocker-compose)の構築手順を紹介しました。podmanは、少なくともRHEL8では主となるコンテナ環境ですので、Red Hat系をよく触る筆者は、dockerからpodmanへ乗り換えていってもよいと考えています。
また、今度はルートレスコンテナがセキュリティ上もよいとされているので、dockerもpodmanのようにルートレス化し、また、kubernetesなどもルートレス化していくと考えられます。
なお、執筆時点では、podman用のpodman-composeもありましたが、まだdocker-composeよりも熟成されていないようなので、今回は採用しませんでした。今後は、podman-composeも取り入れていきたいと思っています。